With the wipe cache partition option, your smartphone will automatically delete all temporary files and fragmented data. This is an interesting function for the Android smartphone because sometimes you might face issues with app crashes like Facebook crashing on a device or some Google Play store errors due to residual files on your device.
By clearing the cache partition on your device, your device will remove those temp and residual files and make your device function well. You can only delete these files by using this wipe cache data function.
Steps to Wipe Cache Partition on Smartphones
By clearing the cache partition on your device, your device will remove those temp and residual files and make your device function well. You can only delete these files by using this wipe cache data function.
So if you are looking for How to Wipe Cache Partition on Android? Here we are going to explain to you How to Clear Cache Partition on any Android smartphone.
Wipe cache partition on Galaxy S5 & other Samsung Smartphones
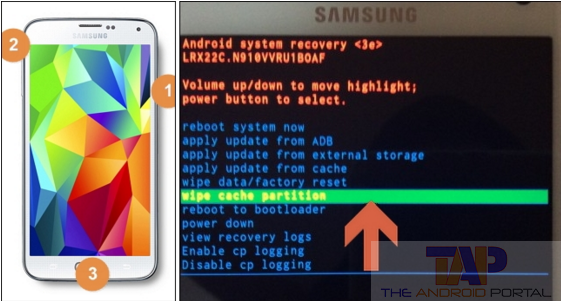
Step 1: First of all, turn off your Samsung Galaxy S5 smartphone
Step 2: Now press & hold the following keys: Power button + Home button +Volume up button
Step 3: Once your phone vibrates, release the “Power” button but keep holding the “Home” and “Volume Up” button
Step 4: Now, select the “wipe cache partition” option by using the volume up and down button
Step 5: To select the “wipe cache partition” option, just press the power button (This process takes only a few minutes ) after completing this process, you can see the same menu again on the screen
Step 6: Now, you have to select the “reboot system now” option by using the power button, and your phone will automatically restart, and now you have wiped your cache partition data on your Galaxy S5 device.
This works on most Samsung smartphones; if this is not working for your Samsung device, check out another option or leave your comment in the comment section.
Clear Cache Partition on Moto G Smartphone
Step 1: Turn off your Moto G
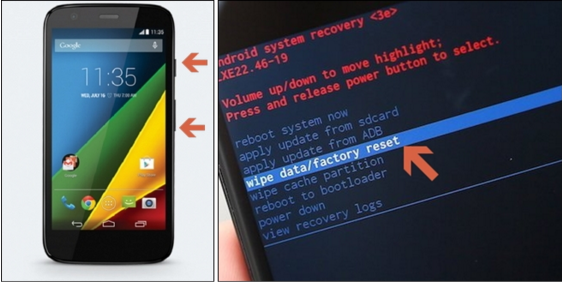
Step 2: Now you have to press and hold the volume down button & power on/off button,(after a few seconds, release both buttons)
Step 3: In the boot option, you have to select “Wipe cache/Factory reset menu” by using the power button
Step 4: Your Moto G smartphone will automatically restart after a few seconds.
Step 5: Select“reboot system now” to start your phone. Now you have done that, you can use this method on other Moto smartphones too.
Clear Cache Partition on Nexus 5
Step 1: Turn off your Nexus smartphone by using the power button
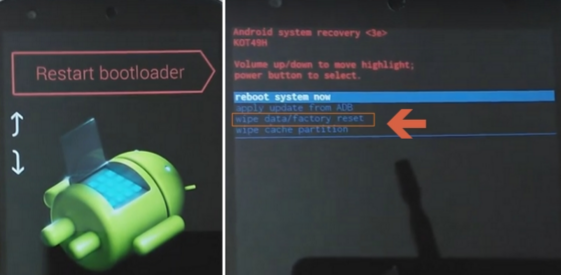
Step 2: Now press and hold the power button + volume down button
Step 2: Choose the “recovery mode” by using the volume up and down button
Step 3: Press the power button to select it
Step 4: When you see the “Google” logo on the screen, press the Power button + Volume up buttons together
Step 5: Here, you can see the few menus on the screen, now, choose the “wipe cache partition” menu and press it by using the power button.
Check out the below video on How to Wipe Cache Partition on Google Nexus 5.
How to clear cache data on the Sony Xperia Z series(Z1, Z2, Z3)
Step 1: To clear cache data, press and hold the Power button and Volume up button few seconds
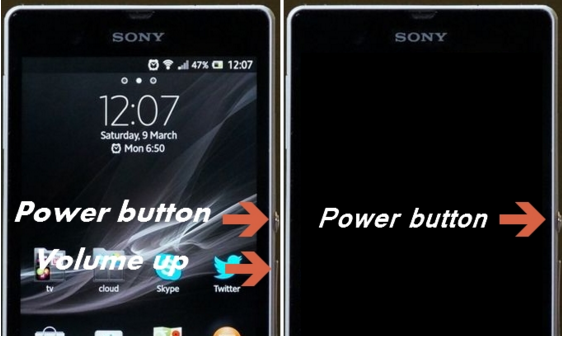
Step 2: Release both buttons when you feel a slight vibration on your device.
Step 3: Wait for a few seconds, then press the power to start your smartphone.
Check out the below video on How to Wipe the Cache Partition on any Xperia Z series smartphone.
How to remove cache data on any Android 5.1 Lollipop OS
You can use a clean master app that is perfect for wiping cache data efficiently from any smartphone. However, all device has a default setting to clear the app cache; check out the below option to clear the cache on your smartphone.
Step 1: Go to the “Setting” menu
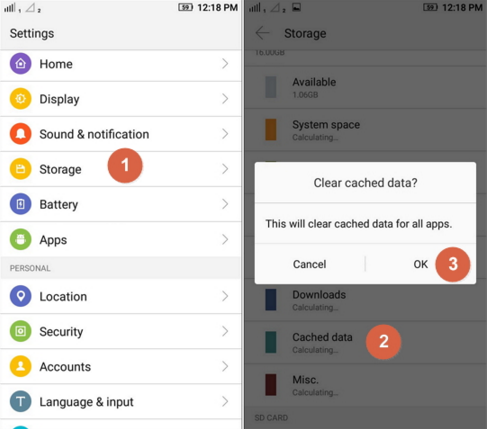
Step 2: Scroll down to the storage menu button & tap on it
Step 3: In the Storage option, find the “Cached data” button and press it
Step 4: After pressing it, you can see a new confirmation message on the screen
Step 5: Now select the “Ok” button & you have done.
Here we have listed the cleaning cache partition methods for almost all the latest smartphones. Tried all those methods & steps? Still, you are not able to wipe the cache partition.
Feel free to comment below with your device model number. We will find out the same for you and create a tutorial on this.


I followed the instructions for the Galaxy S5 and other Samsung androids. It says the cache has cleared successfully but when I press the power button to reboot it shows an error message. The cache data hasn’t cleared and the original problem is still there.