Want to know what is DNS and how to change DNS on Android phones? Here we have everything for you.
If you are using DNS servers on your device by default than you don’t have to stick with them. There are so many reasons to use third-party DNS servers. One of the reason is they may be faster than your provider server or can offer an advanced security system.
So, in this article, we will discuss how to change DNS on Android. But before proceeding to the main topic, I will help you get familiar with the basics first.
What is DNS?
DNS stands for domain name system which acts as the phonebook for the internet. The main work of DNS is to translate the domains into routable IP addresses that can be easily recognized. After this, you don’t want to remember large IP addresses like 151.101.103.114. Moreover, without DNS, you cannot translate the domain address to the routable IP address.
Every device that connects with the outside world (the wide-area network) has one or more than one DNS servers that tell your phone how to get to a given address. Those addresses are associated with your device carrier or with your wireless network.
Furthermore, those DNS services that are provided by your carrier or WIFI network might not always be the fastest medium of translating your domains to IP addresses.
What DNS Address You Should Use?

From the above information, it might sound challenging to change the DNS address of your device manually. However, it is not a challenging thing to do.
If you want to change your DNS address, first you need to know what DNS addresses are available to use. The two best free DNS services available for your device are Google and Open DNS. You can select any of the services as they function equally. Those DNS addresses are:
- Google: 8.8.4.4. And 8. 8. 8. 8
- Open DNS: 208.67.222.222 and 208.67.220.220
How To Change DNS On Android Phones And Tablets?
Android 9 came with some fantastic features and a completely different method of changing the DNS addresses. In the Android 9 version, you can set the DNS address in a single location rather than change the address on a per-network basis. The vast difference between old Android versions and the new Android version is that you cannot configure a standard DNS server such as Google or open DNS.
One of the most common private DNS services is Cloudflare. The Cloudflare DNS address is 1.1.1.1 or cloudflare.dns.com. You can also go for a clean browsing DNS service, which has three different servers which are listed below:
- Security filter, which uses the address security- filter- DNS. clear browsing.org. This blocks your misbehaving activities like phishing, malware, and malicious domains.
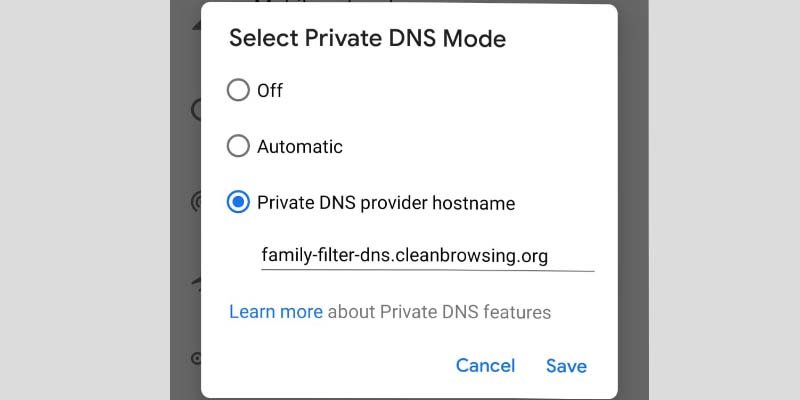
- Family filter, which uses the address family- filter-dns.cleanbrowsing.org, blocks all your access to adult pornographic and explicit sites.
- The adult filter uses the address adult- filter- dns.cleanbrowsing.org, which blocks all access to adult pornographic and explicit sites.
How To Change DNS On Android 9 Enabled Device?

To manually change your DNS on Android you have to follow some quick steps:
- Pull down the notification bar twice and “Tap on the gear icon” at the top left corner of your screen. In the resulting window, click on “Network and Internet”.
- The new window will open on your screen. From the window, tap on the “Advances option” to reveal the “Private DNS entry”.
- Tap on “Private DNS”, and select the option private DNS to “Provide hostname and type” either the cloud fare URL or the clean browsing URL in the given space.
- Tap on the “Save” option.
Note: The option and Menu name on your device could be different, similar to what we have mentioned in the steps. So, use your brain as well when following the steps.
By following these steps, you can easily change your DNS server in Android 9-enabled smartphones.
Changing DNS On Android 8 And Earlier Androids

Pull down the notification bar and tap on the gear icon at the bottom right corner of your screen. In the resulting window, click on the Wi-Fi option.
- Long press on the name of “Wireless network” and tap on “Modify network”.
- Click on the advanced option and from the list tap on “DHCP”.
- From the pop-up window tap on the “Static option” and then on the “DNS1″ option. Type your “DNS address (8.8.8.8)”
- “Tap Save” option to finish.
Note: The option and Menu name on your device could be different, similar to what we have mentioned in the steps. So, use your brain as well when following the steps.
By following the same steps, you can change your DNS address for every wireless network.
Summary
Hope you clearly understand what is DNS and how to change your DNS address.
Do follow TheAndroidPortal and stay tuned for more updates.


