Think that you have lost your phone or it gets damaged that you are unable to use it anymore. But you still need data on your smartphone. E.g. Your captured photos, contacts, music, or any other data stored in the internal memory of your device.
I have seen a couple of people facing such an issue that they have lost their precious photos in such an occurrence. You can easily avoid any such problem by backing up your data. Also backing up an Android phone is quite simple and easy. You just need to follow the simple steps to back up your Android phone to the cloud.
How to Backup Android Online
The simplest way to backup your Android phone to the cloud is by using the Google One backup services.
Go to “Settings” > “System” > “Backup” and toggle on “Backup by Google One“. Go into the Google Account data option and toggle on everything you want to be synced.
Backup Photos & Videos from Android to Google Drive
On the Google Play store, lots of Android apps are available to back automatically your all photos and videos to Google Drive. But the easiest way to back up your picture and videos, is Google Photos.
By using Google Photos, You can back up all your photos and videos from your Android phone. Google Photos allows you to store your pictures on Google Cloud Storage. But you might be thinking about how to enable an auto backup feature for photos on your Android smartphone.
See also: Best Cloud Storage Apps for Android
Using Google Photos App on Android
To back up your all pictures, You have to download the Google Photos app on your smartphone. After downloading the app follow these simple steps to enable auto backup of Google Photos on your phone:
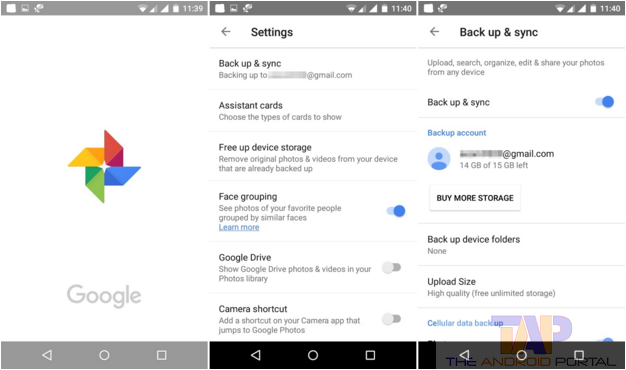
- Open the Google Photos App on your Android device
- Now click on the “Menu” button on the top left side of the screen
- Scroll down and tap on the “Setting” option
- Tap on the “Backup & Sync” option then turn the slider button “ON.”
If you have an Android 5.1 or lower Operating system smartphone, then follow these steps to enable auto backup of your photos on Google.
- Open the “Google Settings” app on your phone
- Scroll down and choose the “Google Photos Backup” Option
- In the Google Photos Backup Section, you can enable it by using the slider button
If you have an Android 6.0 or below Operating System Smartphone, then follow these steps to enable or disable auto backup on Google Photos:
- Open Setting on your phone
- Scroll down and find the “Google” Option and open it
- Navigate to the “Google Photos Backup” option, and then you can turn on auto backup of photos
Download the Google Photos app from below. Check more about how to enable or disable Google auto backup on Android.
Directly upload photos & videos to Google Drive from Phone
You can directly upload all your pictures and Videos to Google Drive using your Android phone. Only you have to download the Google Drive App on your phone. Most of the upcoming smartphones are coming with a pre-installed Google Drive app on it.
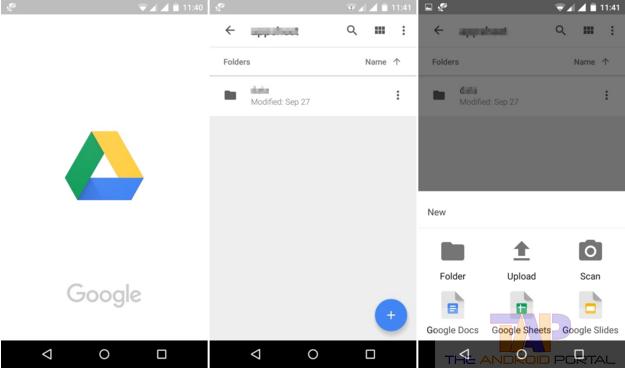
Download the Google Drive Application for Android Devices from the Google Play Store & follow the steps below.
- Open the Google Drive app on your Phone
- Click on “Plus Icon” on the bottom right side of the screen
- Now choose the Upload option, tap on it
- After this, here you have to select the “Images” option
- Now Choose “Pictures” from your device that you want to backup
You can follow the same process to upload and back up videos from your phone to Google Drive. However, we recommend you use Google Photos as it automatically does a task for you. While in Google Drive, you need to upload the photos or videos you want to back up manually. Download the Google Drive app for Android from below.
Dropbox – The best backup app for Android
Dropbox is my favourite Android app to back up my photos and videos to cloud storage. It offers 2 GB of FREE cloud storage when you sign up with them. Also when you refer someone, they award you with some free storage MBs on your account. Follow the steps mentioned below, to backup your videos and photos online on your Dropbox account automatically.
How to back photos & videos automatically using Dropbox
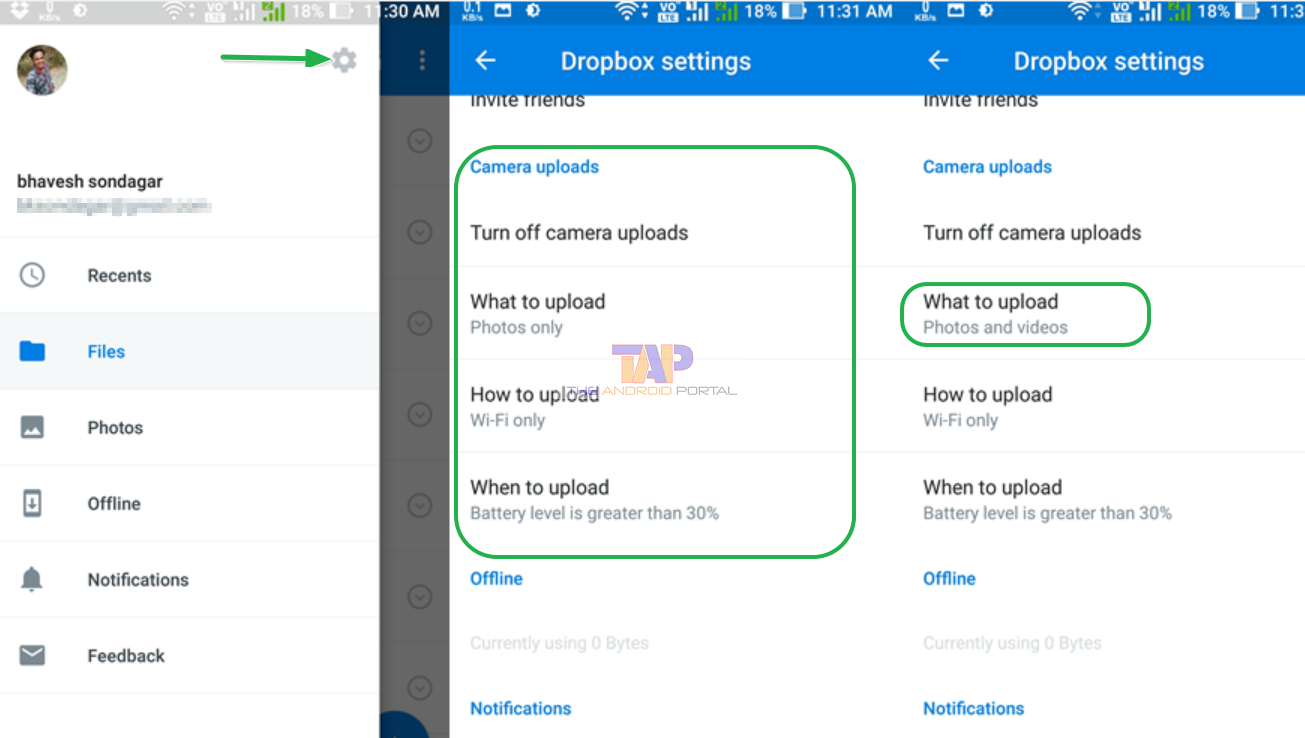
- Sign up for Dropbox for FREE & download its Android app from the Play Store.
- On the top right side, you will see a setting option, tap on it.
- Scroll down and navigate to the Camera Uploads option
There you will have to tap on that option to enable camera uploads. So whenever you take photos on your device, Dropbox will automatically pick your photos on your Dropbox account from a gallery.
Under what to upload option, you can choose either photos or videos and pictures both. Depending on your need, you can select an option from there. On the How to Upload option, you can select Upload these photos over WiFi or data plan.
The upload option allows you to save battery. You can select at how much percentage of battery, your photos should be uploaded. So you can configure your Dropbox so as not to consume more battery when you have less.
Backup Your Phone Call Logs
The process of backing up your call log is very simple. To back up your call logs, you have to download the IFTTT Android app on your phone. In this app, you have to create your backup recipes to back up your data to Google Drive.
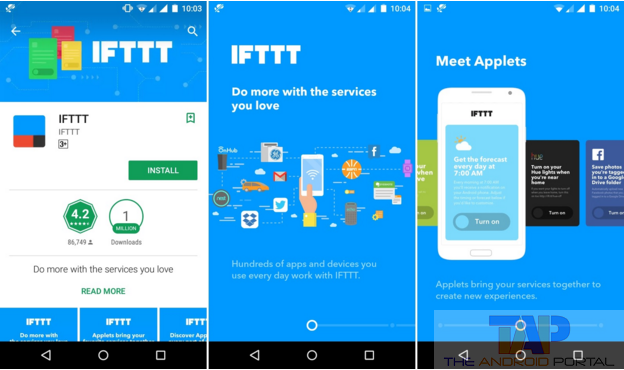
It supports over 360 applications like Facebook, Instagram, Google Drive, Dropbox, Email, YouTube, etc. You can also backup important files, contacts, and photos to cloud storage such as Google Drive or Dropbox. To backup your Phone call Logs to Google Drive follow these steps:
Use the IFTTT App to back Phoe call logs to Google Drive(Manual)
Recipe 1: For Any Phone Call Placed
- First of all, Open the IFTTT Application on your Android smartphone
- Here you have to choose the “My Applets” Section then press the “Plus” sign on the top right of the screen

- Now tap on “this” option, then select “Android Phone Call” service
- Now it will ask you to “Select trigger,” you have to choose the “Any Phone Call Placed” option
- After selecting the trigger, you will automatically be redirected to the applet maker section; here you have to tap on “that” option
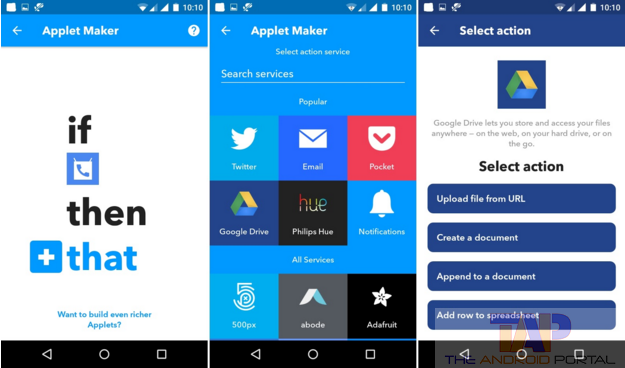
- Now Choose “Google Drive” service in the service section
- Then select the “Add Row to Spreadsheet” option then tap on the “Connect” button
- Now follow the onscreen instructions and press the “Allow” button to give permission.
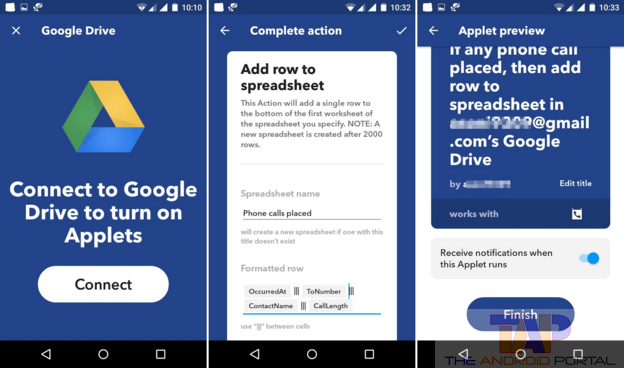
- Then press the “Finish” button to complete an action.
Recipe 2: For Any Phone Call Answered
Open the IFTTT app on your phone and tap on the plus sign to create a recipe.
Tap on “this” option > then choose “Any Phone Call Answered” > tap on “that” > Google Drive > Add Row to Spreadsheet option. Now follow onscreen instructions then press the “Finish” button to complete an action.
Recipe 3: For Any Phone Call Missed
Open the IFTTT app > tap on “this” option > choose “Android Phone Call” > select “Any Phone Call Missed” option > now choose “that” option > Google Drive > Add Row To Spreadsheet option. Follow the on-screen instructions and tap on the “Finish” button.
Now every time you receive a phone call on your Android smartphone from another or you make a phone conversation from your Android device; The IFTTT app will be automatically backed up. Now all your call data as a row in a Google Spreadsheet in your Google Drive.
After that, whenever you make a phone call to any number from your Android Smartphone, the app will automatically create a backup data of your phone calls. It looks something like this.
Use Google Account To Backup & Restore Call Logs(Automatic)
All smartphones have this default option to backup and restore call logs on Google account. You can easily enable or disable this option from the settings option. Just follow the steps mentioned below to backup & restore call logs on your smartphone.
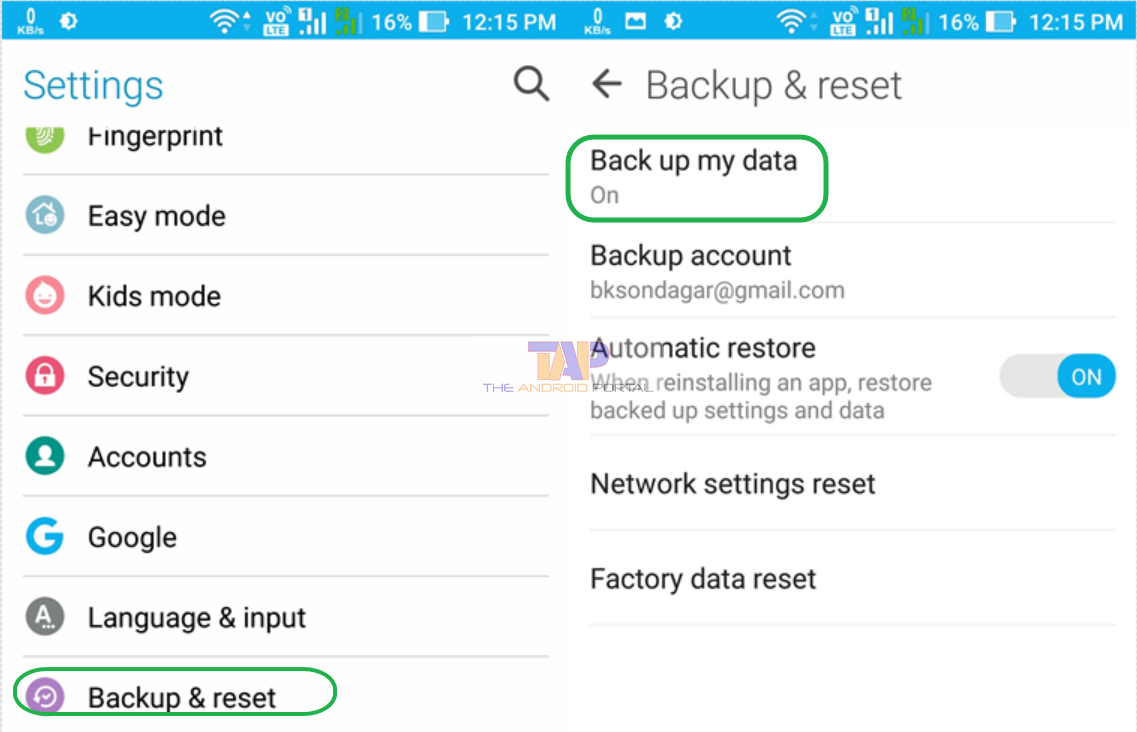
- Go to Setting
- Tap on the Backup & reset option
- Enable that option that says backup my data
So whenever you place a call, miss a call, or receive any call, it will automatically be stored in your Google account. When you factory reset your phone or switch to a new Android phone, you just need to configure your existing Google account with that device. All your phone call logs will be automatically synced with a new device without any backup or restore.
Backup Text Messages from Android to Google Drive
Backing up your Text messages is similar to how you back up phone logs. To back up your all text messages, only you need an IFTTT application on your Android device. Now follow these simple steps to back up your all text messages from your Android smartphone to Google Drive.
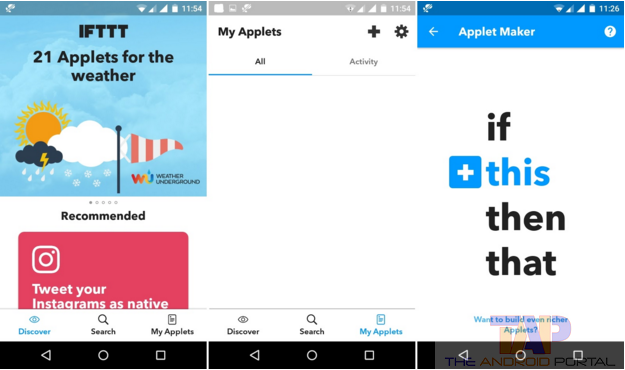
- Open the EFT Application on your Android phone, Then tap on the “Plus” sign to create a recipe
- Now select “This” in the applet maker section
- Here you have to choose the “Android SMS” option and choose the “Any New SMS Received” trigger
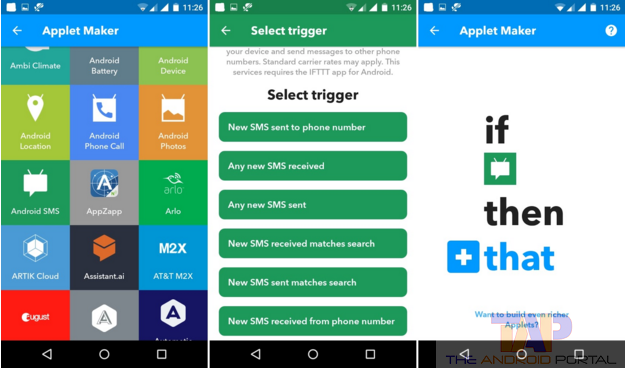
- Now tap on the connect button and choose the “That” option
- Select “Google Drive” from the service section then choose the “Add Row to Spreadsheet” option
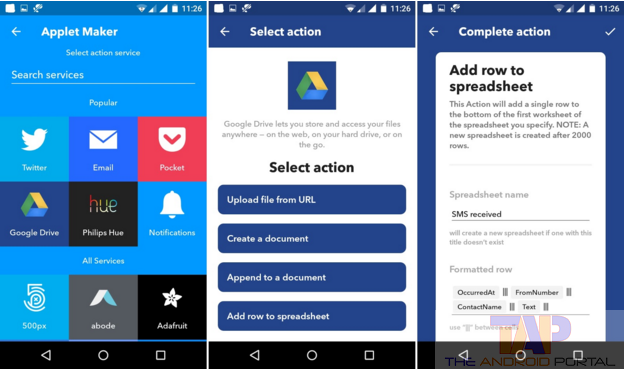
Now follow the onscreen instructions and tap on the Finish button to complete an action. You can also create a new spreadsheet for sending messages, using the same method.
There are some other apps like Gcloud backup and Super backup that also allow you to backup your text messages from your Android device.
Backup Notes
Some people are using notes on their devices to store their passwords or something that they want to remember. Here you will see how to backup notes using Google Keep.
On Android phones, the Built-in Notes app does not back up your notes anywhere. But if you still want to back up notes and documents to a Google account, we have a solution. You just need to download and install Google Keep on your Android phone.
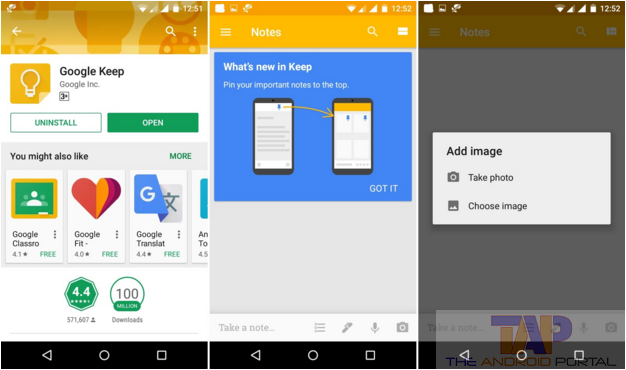
Google Keep stores your notes on your Google account. It automatically backs up every note you make in Google Keep. These notes are synced across all your devices so that you can access them from a computer, smartphone, or tablet.
You don’t have to worry about it, just log in to your Google account and get your notes from wherever you are. Only you have to download the Google Keep App on your Android. Download Google Keeps from below.
Backup Music & Audio Files
Google Music Manager allows you to upload your favourite Music or songs from your computer to your Google Play Music.
You can upload over 50000 songs and also listen on your mobile whenever you want. You can stream your favourite music on your Android TV, Computer, or other Android device. To upload your music, you need to use your PC.
- First of all, Open the web browser on your computer and go to the Google Music Manager Download Page
- Follow the onscreen instructions to complete the process
- Then complete the installation process to install Google Music Manager on your computer.
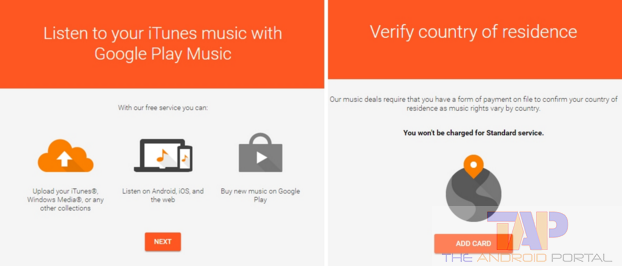
After downloading Google Music Manager on your computer. Follow these steps to set up the music manager:
- Open the Google Music Manager app on your PC
- Now log in with your Google Account details and then select the location your music location (here you have to select Country)
- Follow the onscreen setup instructions to complete the action.

After Setup, How to Upload Music on Google Music Manager
- Open the Music Manager App on your PC
- Now Select the “Upload” tab, Click on the “Add Folder” button to browse and choose music.
- After choosing music, click on the “Upload” button to complete this.
Backup Contacts
Backing up contacts of your phone to Google Cloud Storage is a very straightforward process. By using this method, your phone will back up your all contacts automatically. Only you have to enable auto backup from your phone settings.
To enable auto backup on your Android phone, follow these simple steps:
- Open-Built in Contact app on your phone
- Click on the three-dotted “Menu” buttons on the top right side of the screen
- Choose the “Accounts” option,
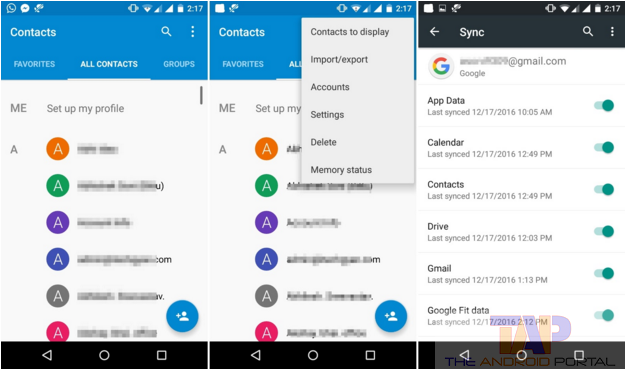
- Here you have to select the “Google” option
- In the Google option, Choose the Account you want to use for backup
- Now find and enable the Contacts option using the slider button
So from now on, all your contacts will be synchronized to your Google account. While saving a new contact to your phone, you will be asked where you want to save this new contact. e.g. Phone storage, memory card, Google account, etc. Select your default Google account while keeping a new contact on your phone.
Need more help in backing up your Android smartphone? Check out the below video for more details.
Should You Backup Android Phone?
Unfortunately, you should, however, it is not necessary. But to be on the safer side, all of us should have a backup of our data. So if we lose our mobile or it gets damaged, we can have our data with us. Using the backup solution provided above will help you not to worry about losing your sensitive data.
Do let us know what you think about backing up your Android phone to the cloud. Is it necessary for you? Share your comment below with your personal experience. We would love to hear from you.


