We have come across compressed files most of the time since started using the PC. To access the data of the compressed files, we need to extract the compressed files. It can easily be done on the PC and also on the smartphone nowadays.
But, where to look when you want to create an archive file on the smartphone? Because there are numerous files on mobile that you continuously need to transfer. So, at that time, you need to look up to one of the best apps called as ZArchiver Android App.
To learn more about the functions of the ZArchiver Android App, have a look at the entire guide below.
ZArchiver Android App – Everything You Need To Know

What is the Archive File?
Manier times, people might get confused when they come across Archived Files and Compressed Files. Also, most of the users believe that both these files are the same. Is it the same files? Or both are synonymous with each other? If you are also believing this, then you are on the wrong track.
Generally, both these files are the same even after being different. Archiving files or Compressing files are the same process. Both will perform the same function of collecting multiple files or sometimes directories in a single file. Even though, there is only one thin line of differentiation.
When you archive the files, it can gather multiple files in a single file without reducing the size of the files. Also, when you are compressing the files, it does the same job. But, the main difference is Size Reduction. The Compression of the files will reduce the size of the files when you collect them.
In short, to understand the archive files and compressed files in a single line, what to say? The archive file can include more than one file in a single file without size reduction. However, a compressed file includes more than one file in a single file with size reduction.
The main advantage of these files is easy portability. When you archive the files, you do not need to find the single file over the folders. Just, select all the important files and create an archive of it.
Availability

The ZArchiver Android App lets you create and extract the archive files and compressed files. In terms of the availability of this app, any Android User can easily download it from the Google Play Store.
This app is readily available at no cost. It will be highly compatible with all of your Android-powered devices.
Features
The ZArchiver app is the best app for archive management. It comes with a user-friendly interface. Using this app, you can create an archive containing the types like 7z (7zip), zip, bzip2 (bz2), gzip, XZ, and tar. Also, you can easily open any compressed files. It can also open the archive file directly from the Email.
In terms of extracting the split archives, it supports 7z, zip, and rar formats. It also allows you to edit the created archive. You can quickly remove or add the files in the created archive. In terms of sensitive data, you can create password-protected archives too. Also, it lets you extract the same.
It is very familiar with file formats like 7z (7zip), zip, rar, rar5, bzip2, gzip, XZ, iso, tar, arj, cab, and many more to decompress. To view the archive what it contains, you can view with 7z (7zip), zip, rar, rar5, bzip2, gzip, XZ, iso, tar, arj, cab, lzh, lha, lzma, xar, and more formats.
In terms of the app customization, it is allowing you to change the app language from the available. More than that, you can also set the app background according to your needs.
Change the App Language
Just right above we have listed that you can change the language. So, let’s start with the same point. Very first, make sure that you have this ZArchiver Android App on your mobile. If not, then make a way for the app on the device.
There are numerous languages used around the World. Some of the regions may not be comfortable with the English. That’s why nowadays most apps let their user change the app language. As soon as you download the app, it will run in the language that the system is using.
The below steps will assist you in changing the App Language.
- Open the ZArchiver App.
- Look at the top right corner, three dots are there. It is a Menu option.
- Tap on it. It brings options like Multi-Select, Sort by, Create, Settings, About, and Exit.
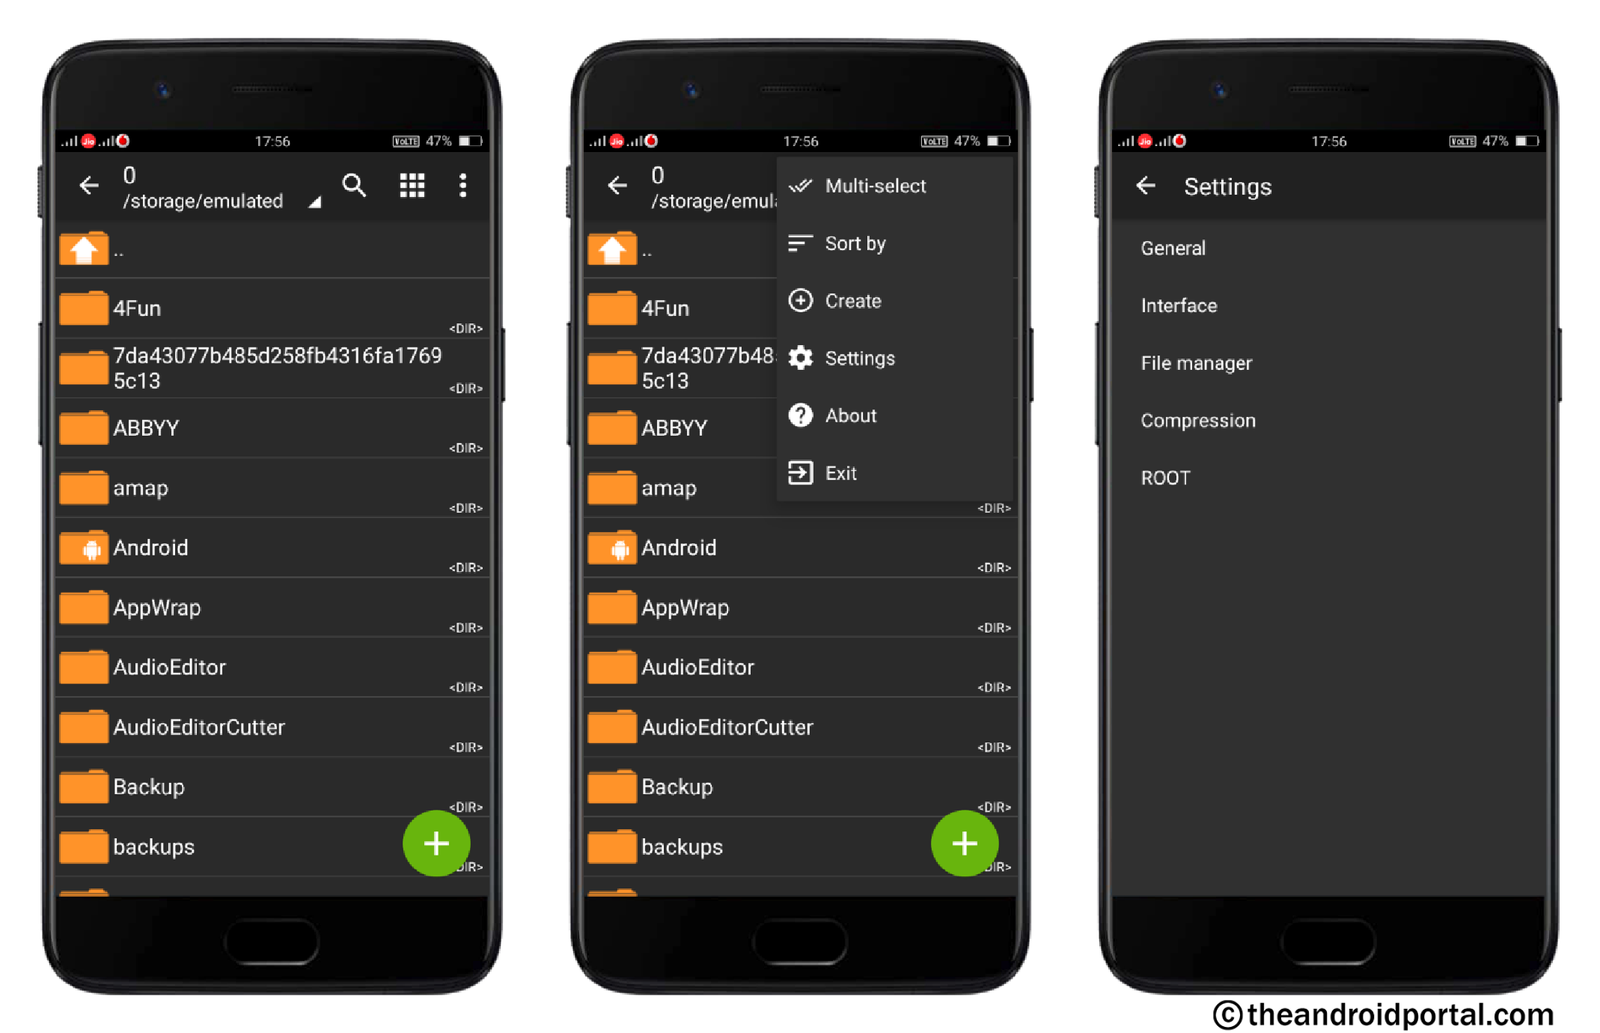
- Go to the Settings.
- It again offers General, Interface, File Manager, Compression, and Root.
- Here, go to the Interface option.
- Next, the very first option is Language.
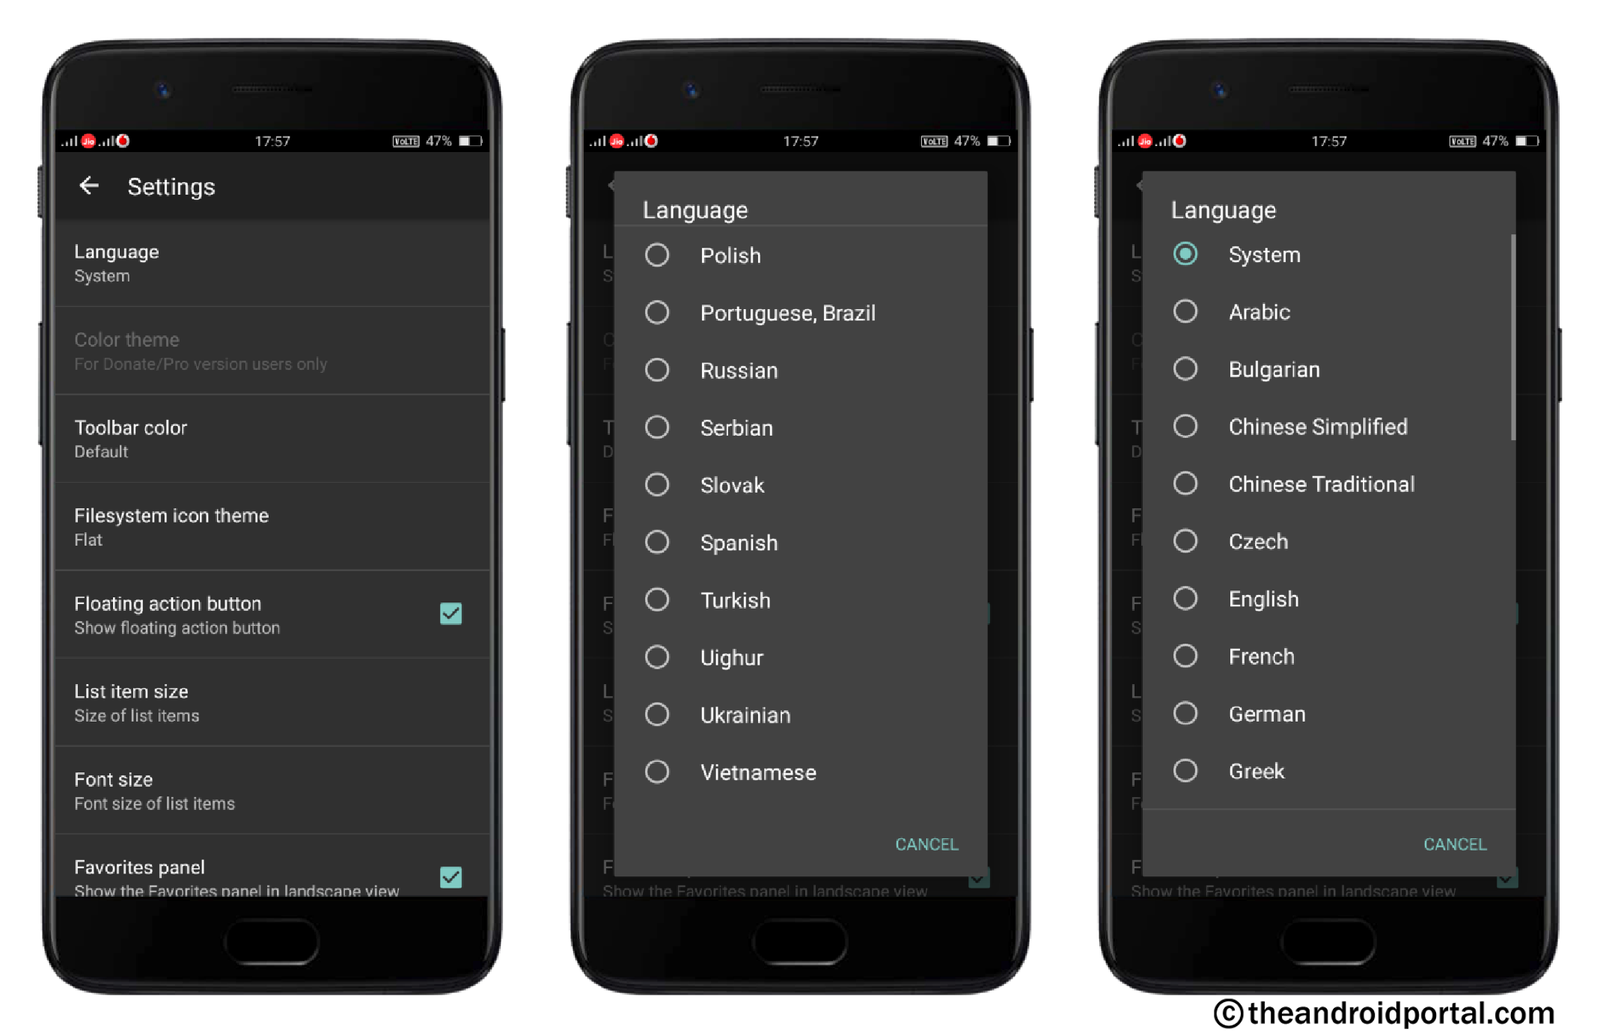
- It will offer many languages including Arabic, Bulgarian, Chinese (Simplified and Traditional), English, French, German, etc.
- Choose the suitable one for you.
Change the Background
Like you change the background on your mobile, you can also change the background in this app. You can directly set the System Background without browsing the location of that image. So, here find that way of changing the background in the ZArchiver Android App.
- Open the ZArchiver App.
- Tap on the Menu option looks like three dots at the top right corner.
- It brings options like Multi-Select, Sort by, Create, Settings, About, and Exit.
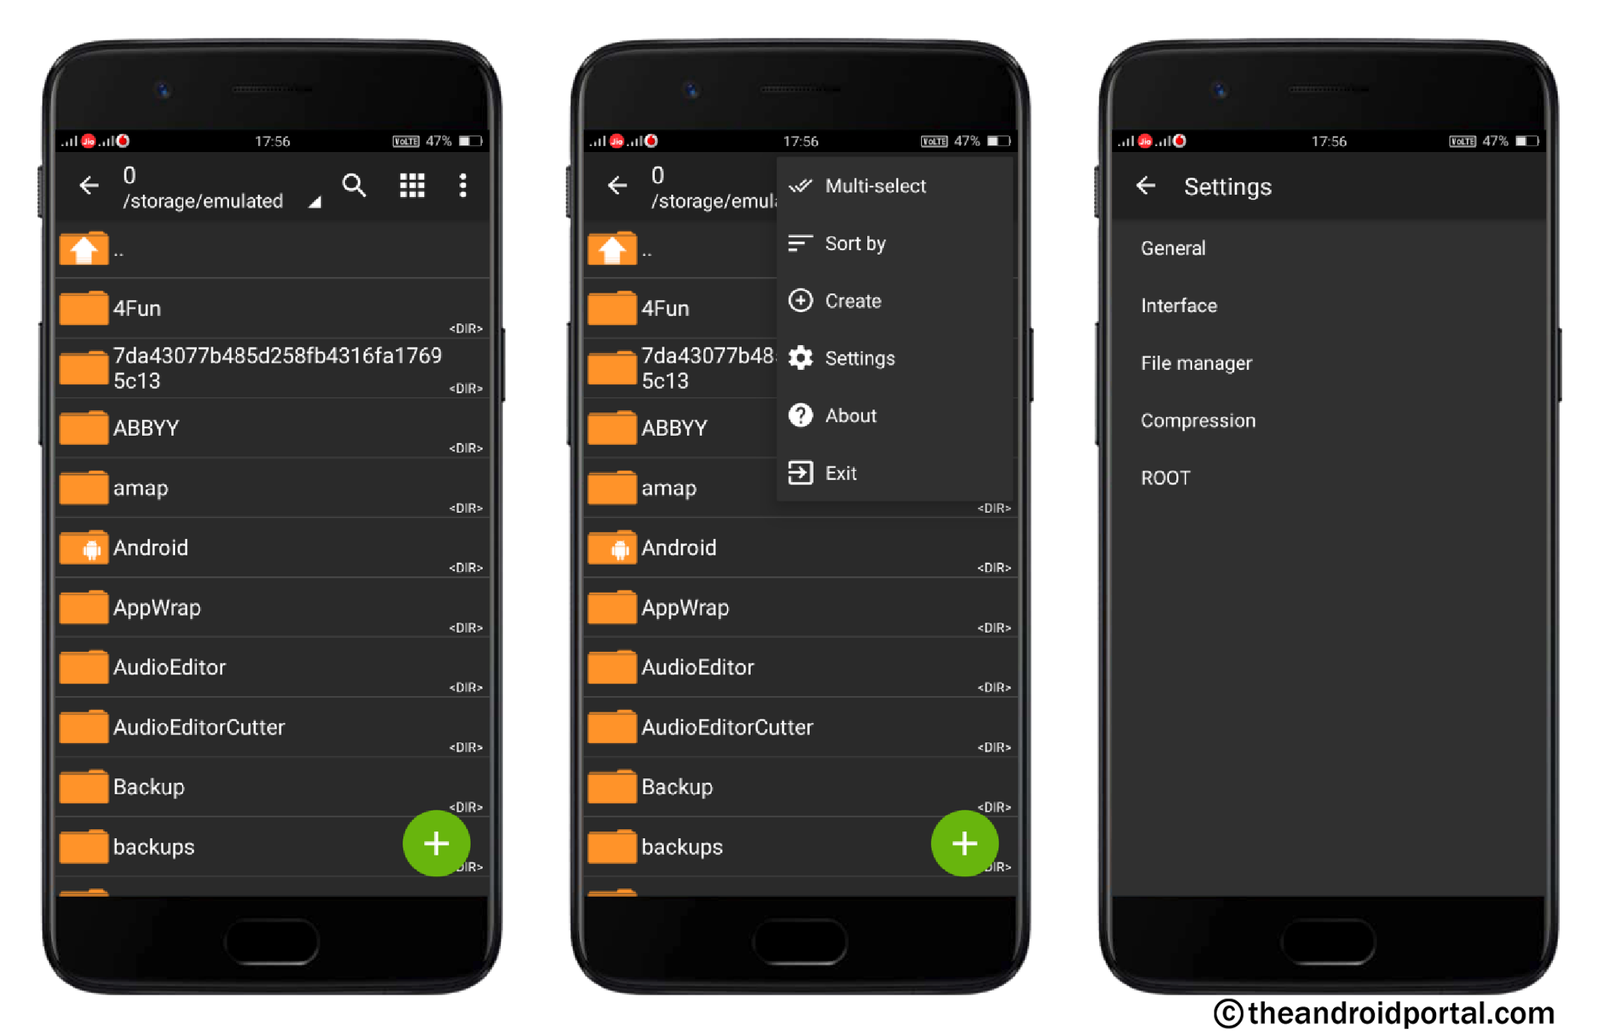
- Go to the Settings.
- Again, you will have options like General, Interface, File Manager, Compression, and Root.
- Here, go to the Interface option.
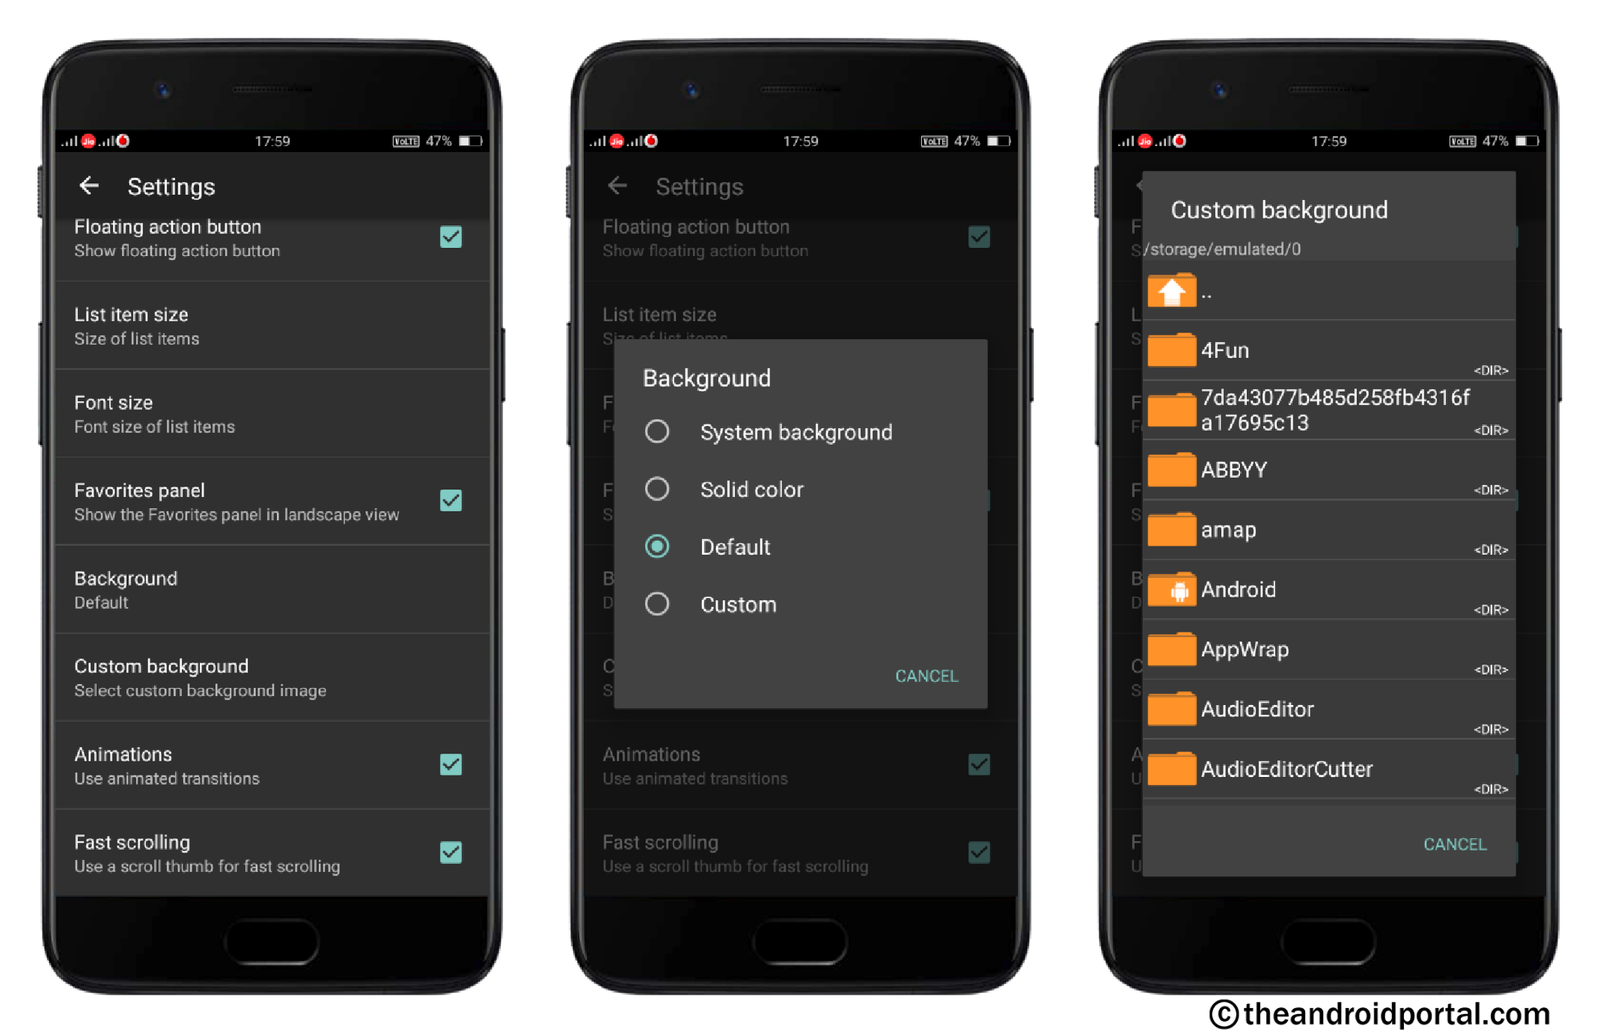
- Scroll down the display and you can have the Background option.
- A tap on it will give you more options like System Background, Solid Color, Default, and Custom.
- Choose from the available options to set the background for the app.
Apart from this, you can use the Custom background to set your favorite image as a background. For that, go to the Menu >> Settings >> Interface >> Custom Background. This option is placed right below the Background option.
Enable Show Hidden Files
We all are familiar with the hidden files. The hidden files are the files that can’t be visible on the device. Well, the data or files you have included in the hidden files will remain safe. Whether you are using a PC or mobile, on both platforms, you can hide the files that contain secret and sensitive info.
Rather than keeping all the files different in a hidden file, it is better to create its archive. If you want to do so, the hidden file must be visible in the app. And, for that, you need to enable the Show Hidden Files option.
So, take a look at the steps that help you enable the Show Hidden Files.
- Open the ZArchiver App.
- Tap on the Menu option looks like three dots at the top right corner.
- It brings options like Multi-Select, Sort by, Create, Settings, About, and Exit.

- Go to the Settings.
- Again, you will have options like General, Interface, File Manager, Compression, and Root.
- Go to the File Manager.
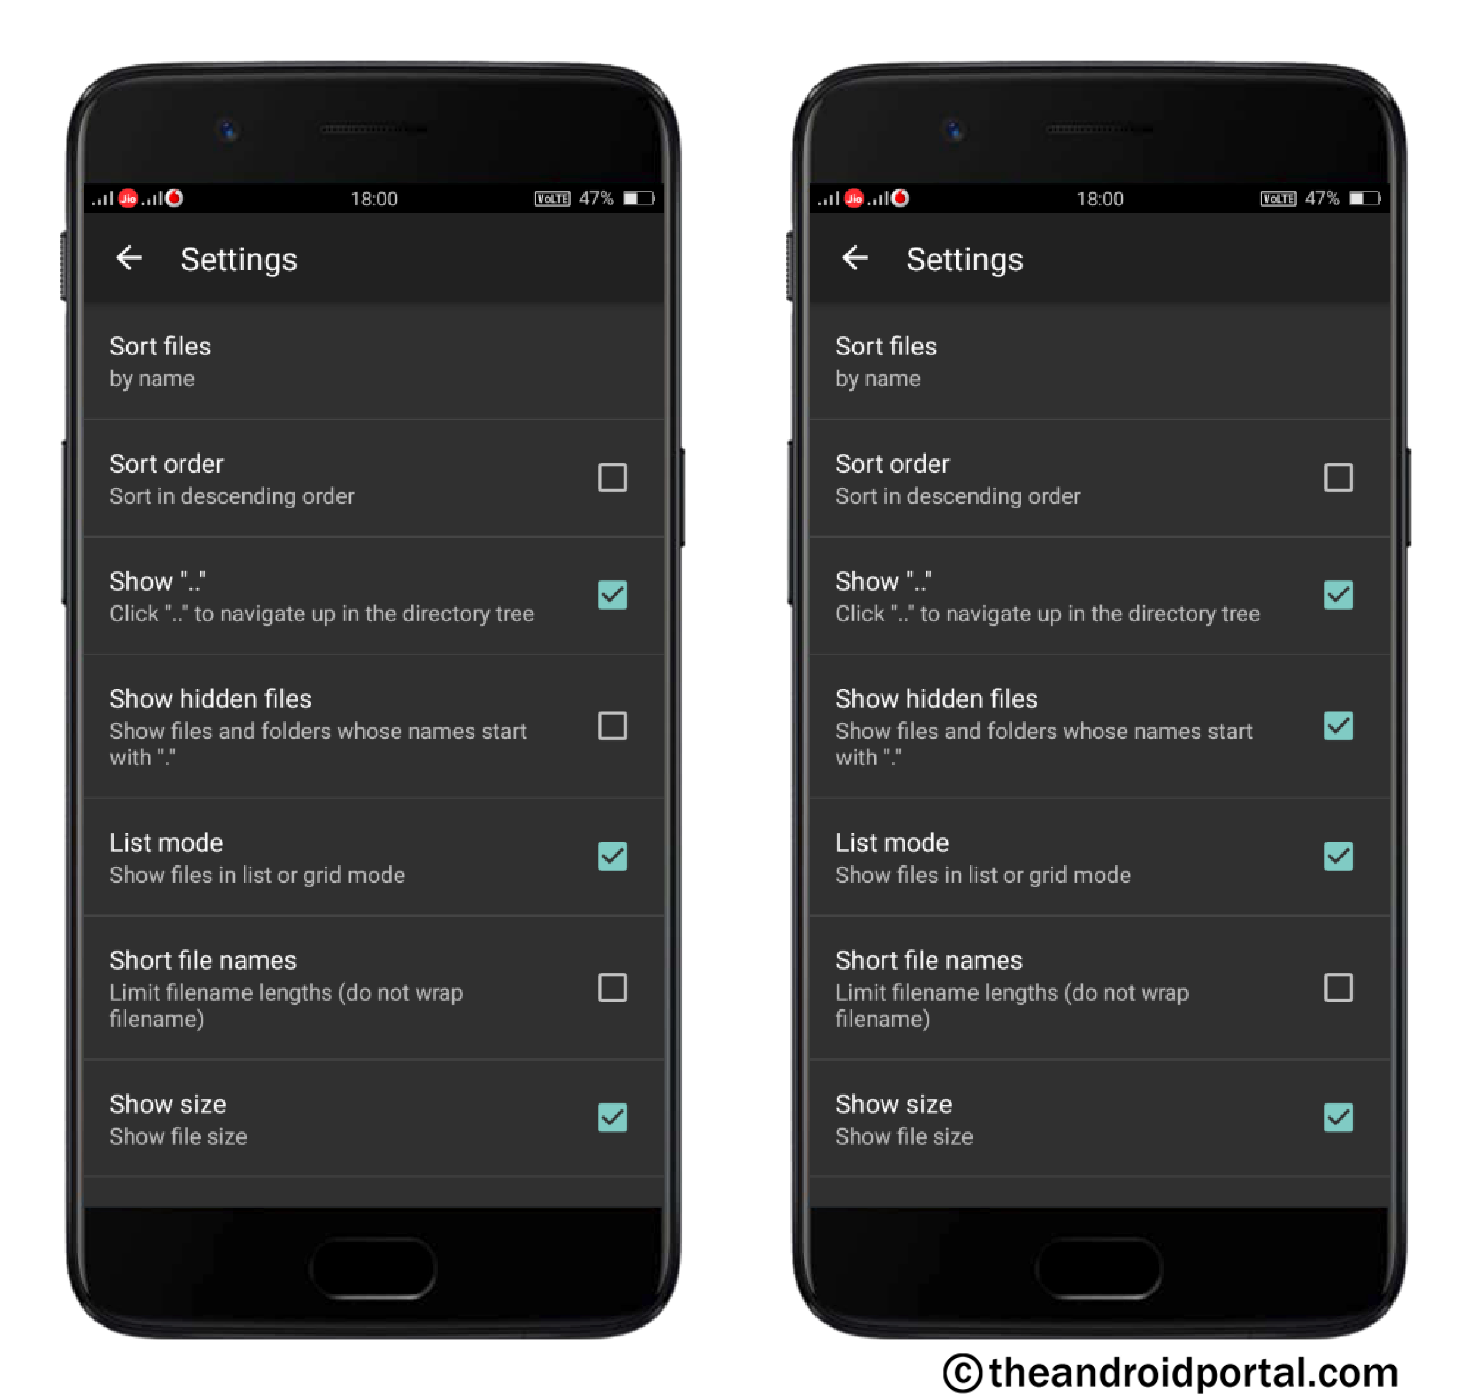
- Next, look at the fourth option Show Hidden Files.
- Also, there is a tick box.
- Just, tick the box and back to the main display.
Now, you can see all the hidden files.
Create Archive File
Alongside extracting the files, ZArchiver will also let you create the Archive Files for easy portability. Other than this app, you may find tons of tools for archiving files. But, what matters is the simplicity of the use. That’s why the ZArchiver tops the list for easy archiving of the files.
To create the archive files using the ZArchiver, follow the below steps.
- Open the ZArchiver App.
- Browse the folder for which you want to create an archive file.
- Here, select the files.
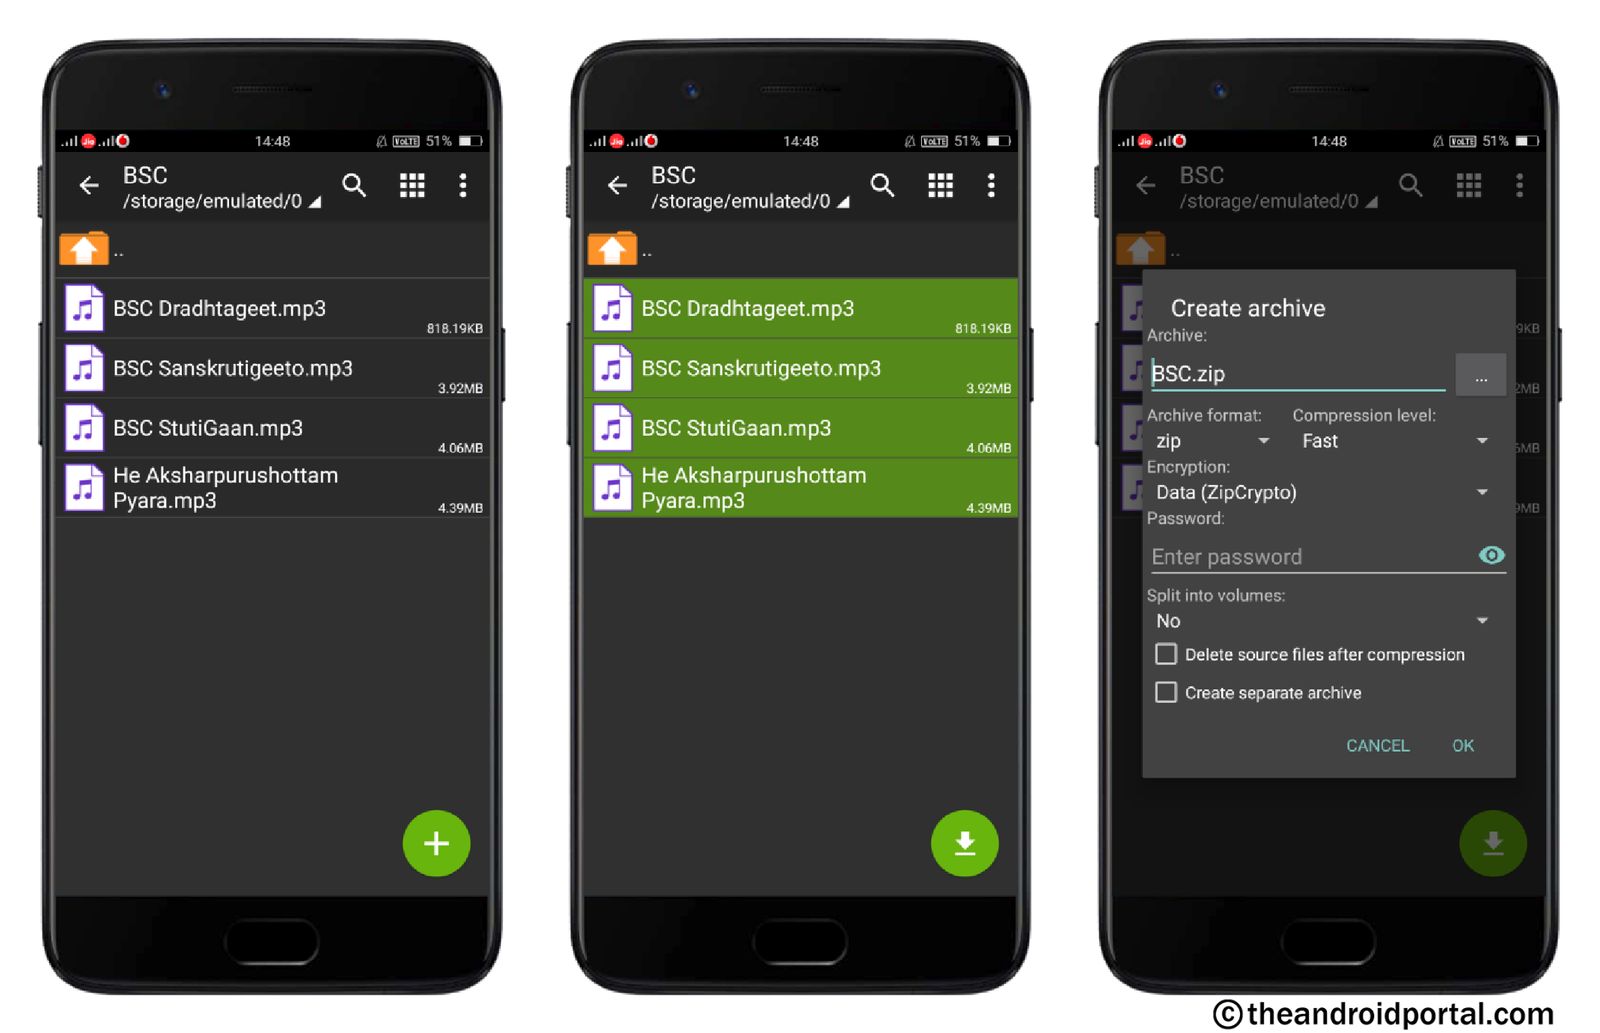
- As you select the files, the + sign at the lower right corner will convert into ⇓.
- Tap on it to create an archive file.
- Now, type the name of the archive files that you want to set.
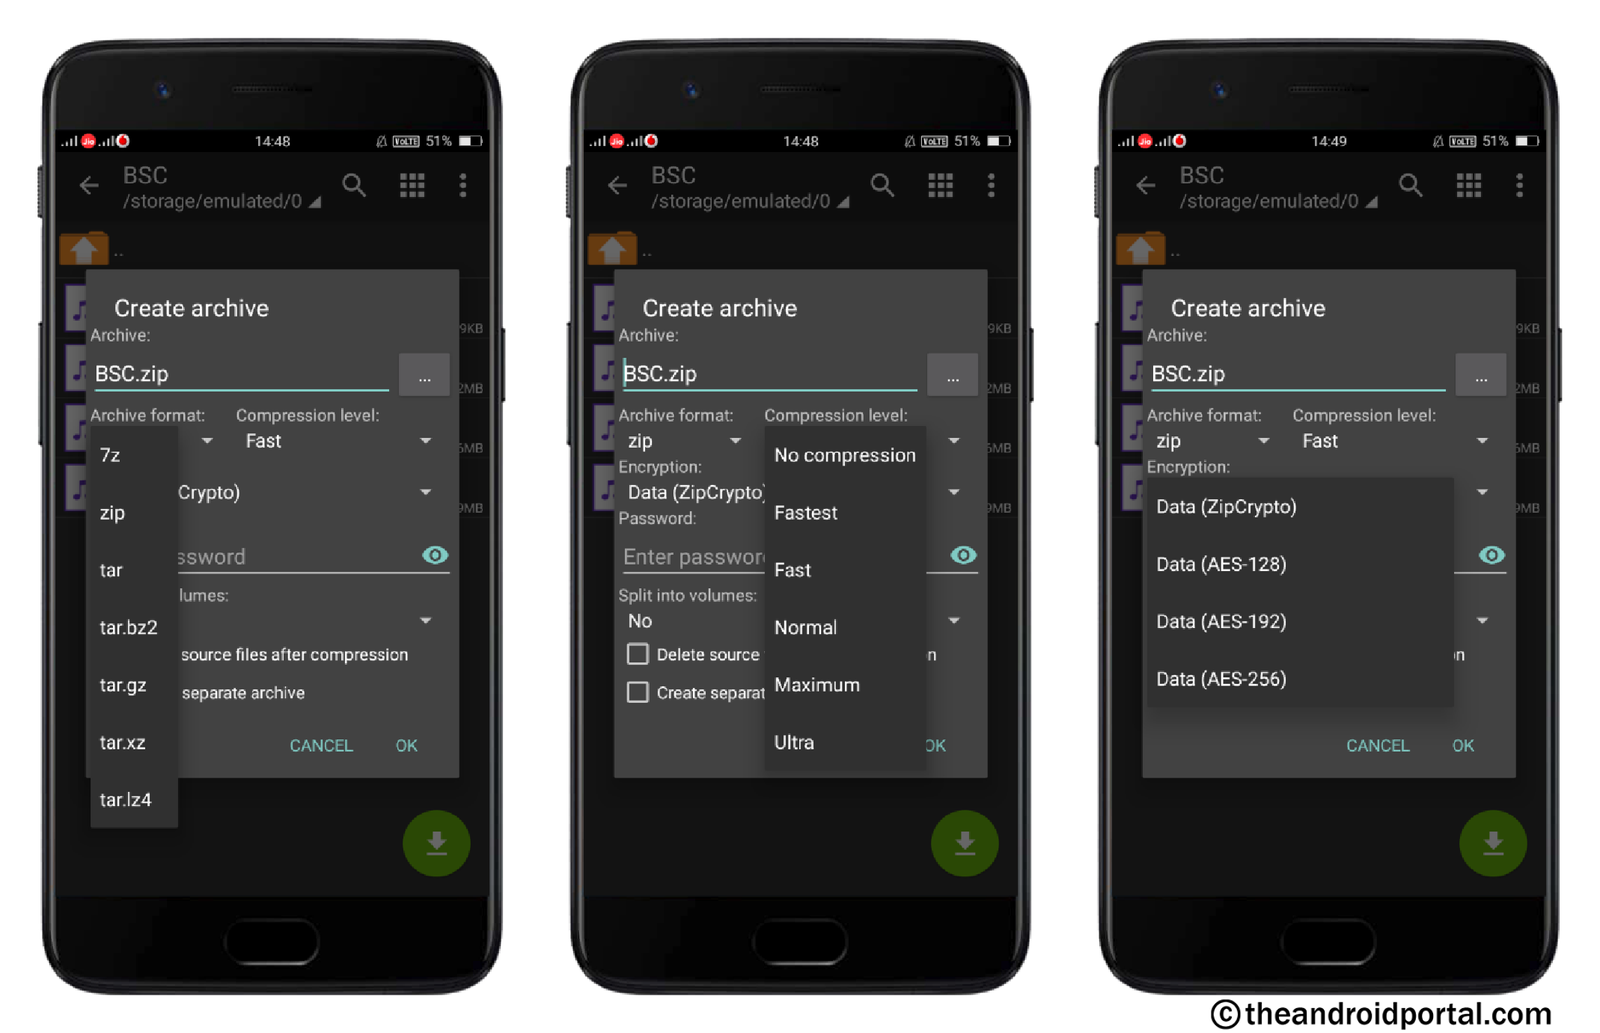
- Then, tap on the Archive Format option. It offers various formats to choose from like 7z, zip, tar, tar.bz2, tar.gz, and tar. xz, and tar.lz4.
- Also, it lets you set the compression level from No Compression, Fastest, Fast, Normal, Maximum, and Ultra.
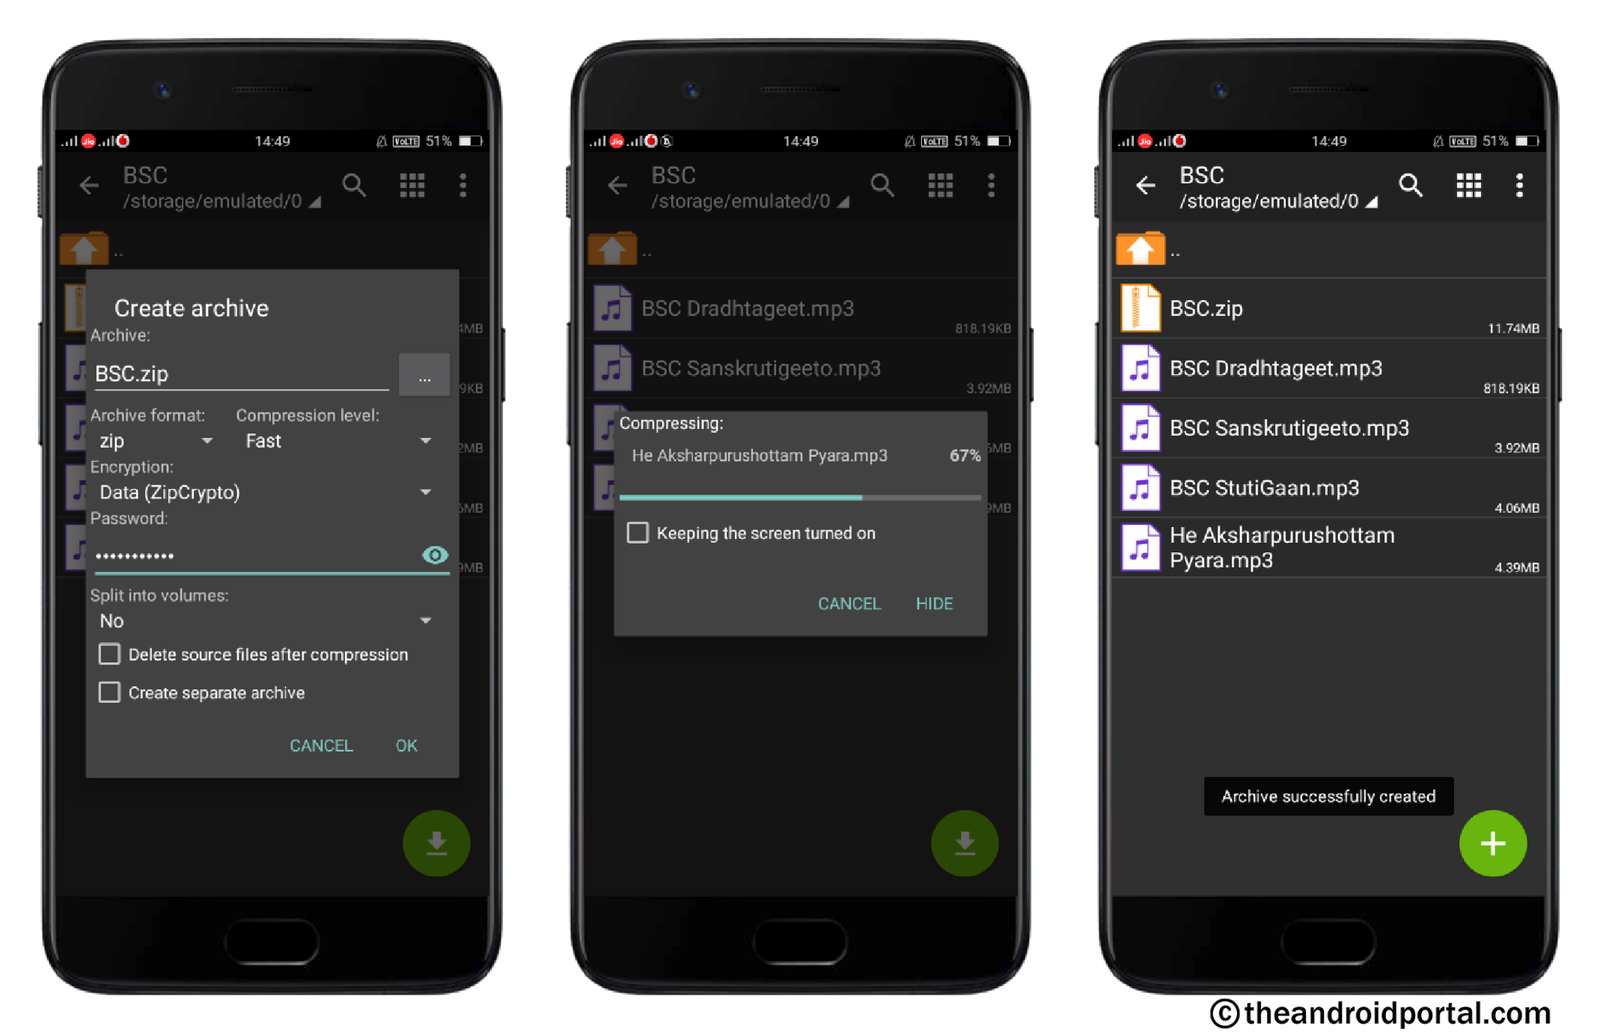
- To access the file, you can set the encryption such as Data (ZipCrypto), Data (AES-128), Data (AES-192), and Data (AES-256).
- After that, tap on the OK button to create the archive file.
Also, you can create a new archive in two other ways.
- Open the app >> Tap on the + sign >> Ok >> Select files >> Tap on √.
- Open the app >> Tap on the Menu >> Create >> New Archive >> Ok >> Select files >> Tap on √.
View Archived Files
What is the archiving of the files? Well, now you will have that answer if you have passed through each topic of the guide. Although it, archiving the files is a process of composing multiple files in a single file without size reduction.
How do you know what the shared archive files consist of? To know that, you need to check it. When you open the archived files in the mobile storage, first it asks you to extract the file. This ZArchiver app offers the view option to view the content of the archive files.
- Open the app.
- Go to the folder which contains the archived files.
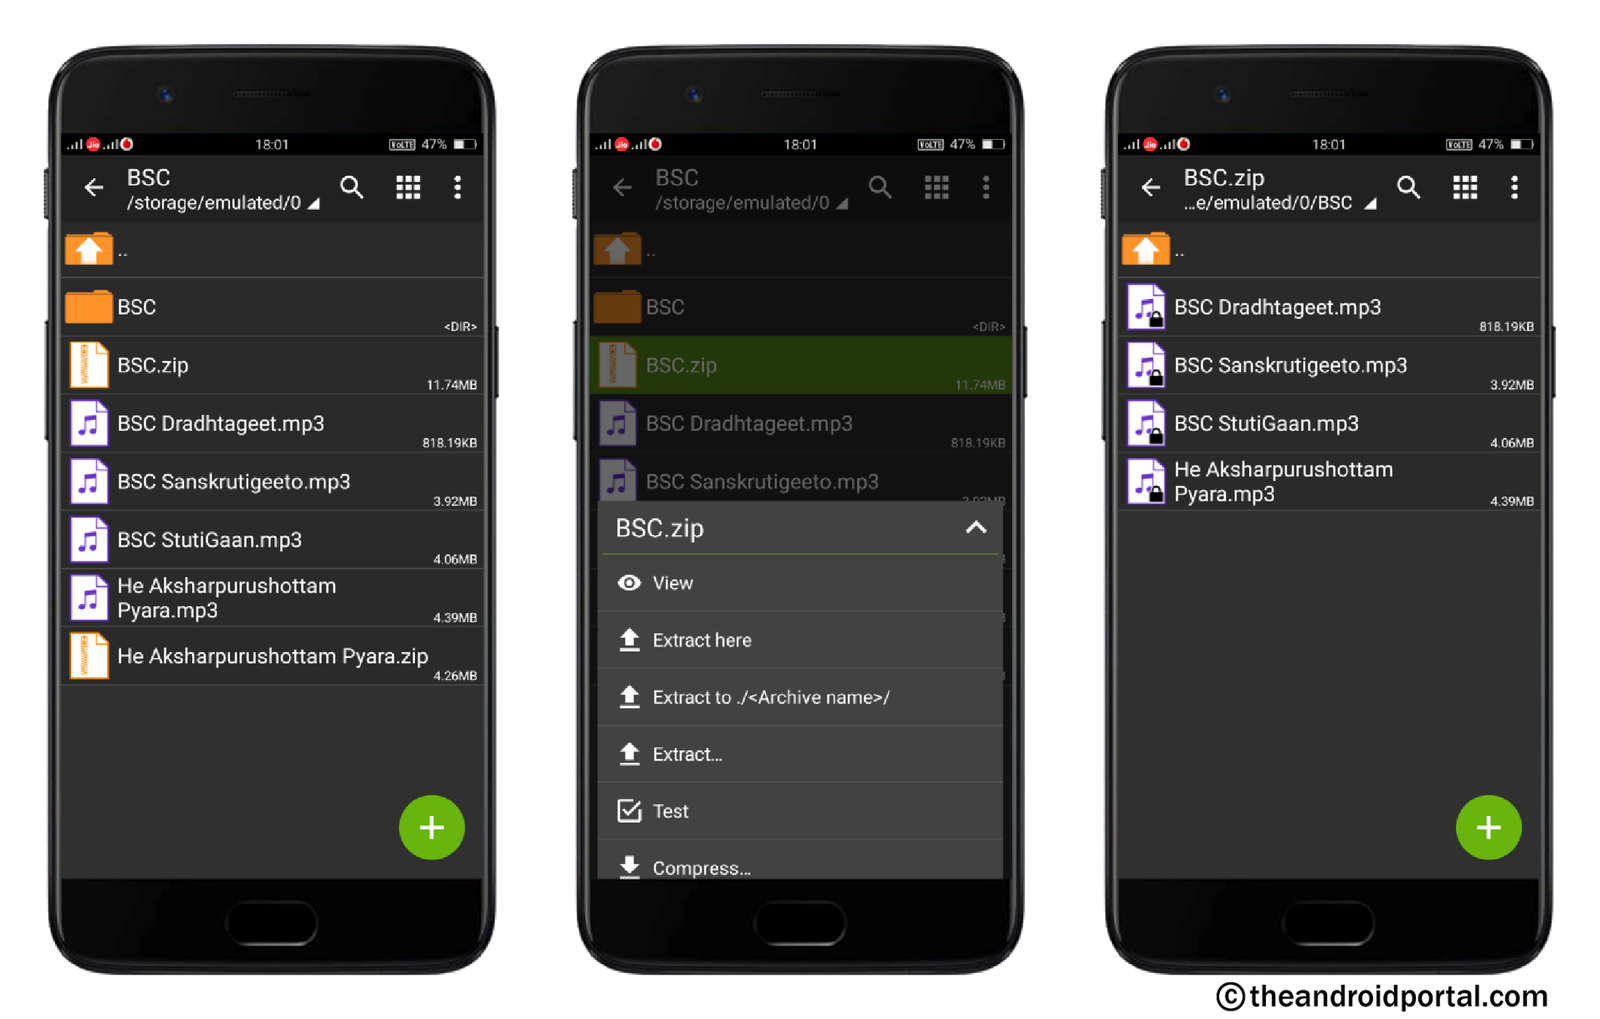
- Here, tap on it to have some options like View, Extract, Test, and Compress.
- Tap on the View option to view the attached files in it.
In this way, you can view the attached content of the archived files easily using this app.
Test Archived Files
One of the important aspects of archived files is to check whether they contain errors or not. While extracting the archived files, one of the common errors that appear is a Transfer Error. Also, you may come across the error called “Cannot open file: it does not appear to be a valid archive.”
These types of errors become the guest when the data of the archived files get corrupted while downloading, moving, or transferring. By applying the rule of “Prevention is better than Cure”, it is better to get to know about the error before extracting it. To check for an error, this app offers a Test option.
Here you can find how you can check the archived files using the Test option.
- Open the app.
- Go to the folder which contains the archived files.
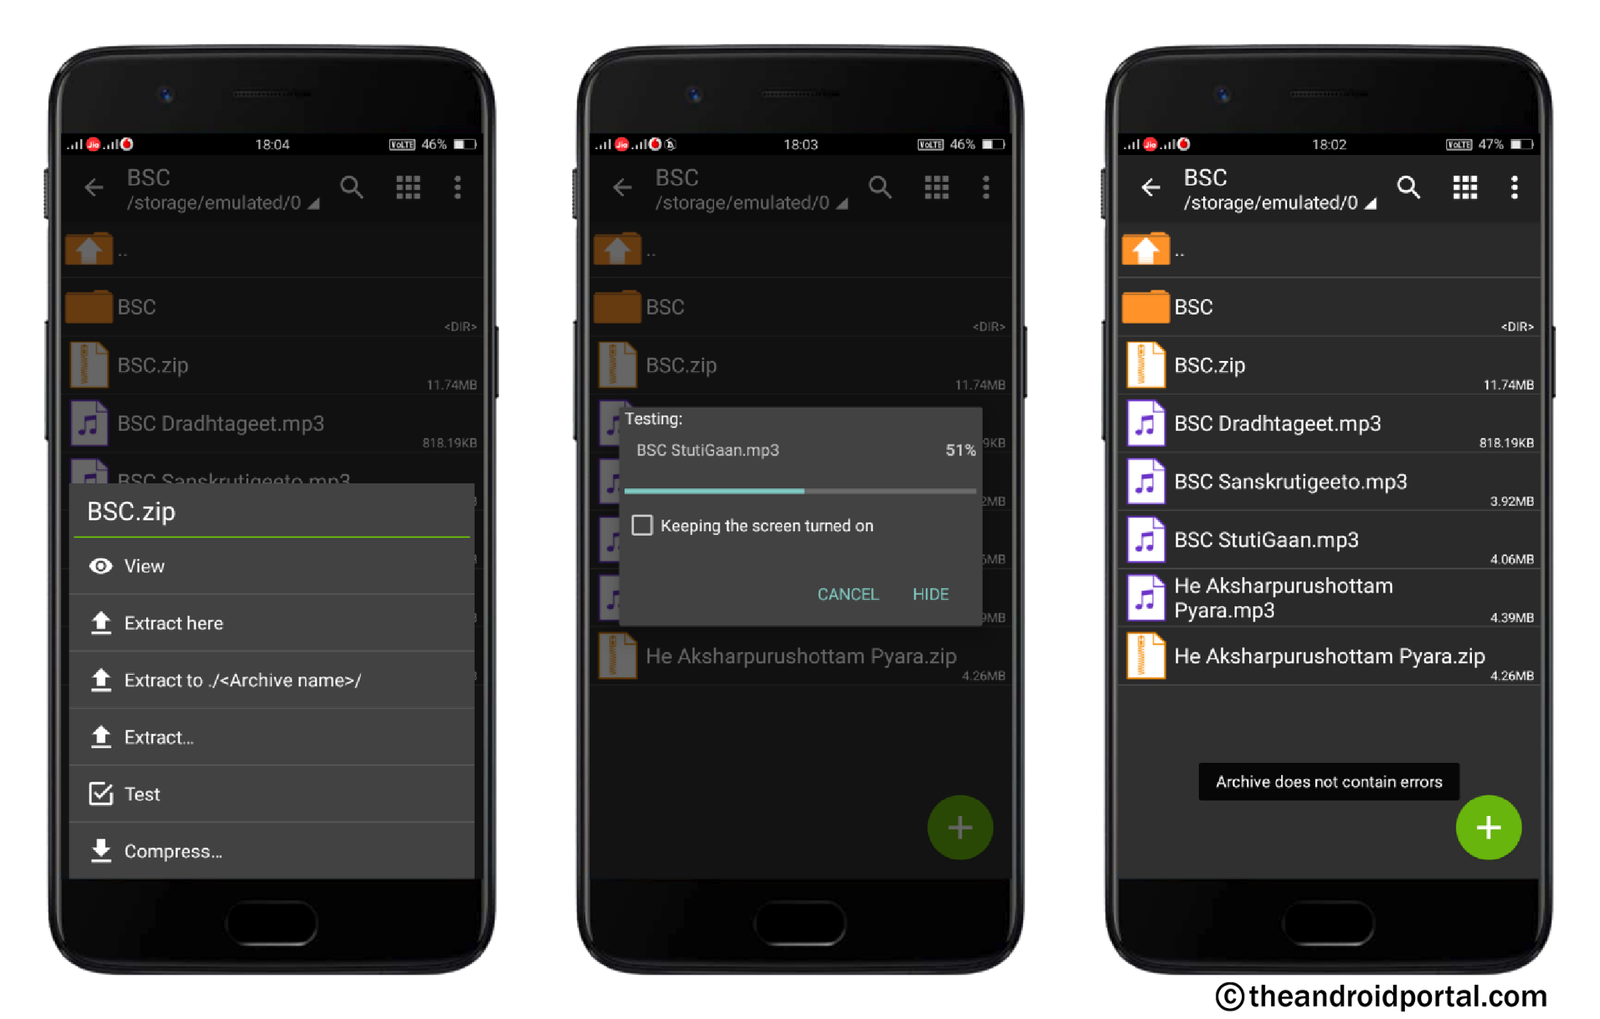
- Here, tap on it to have some options like View, Extract, Test, and Compress.
- Select the Test option and it will start to check the file.
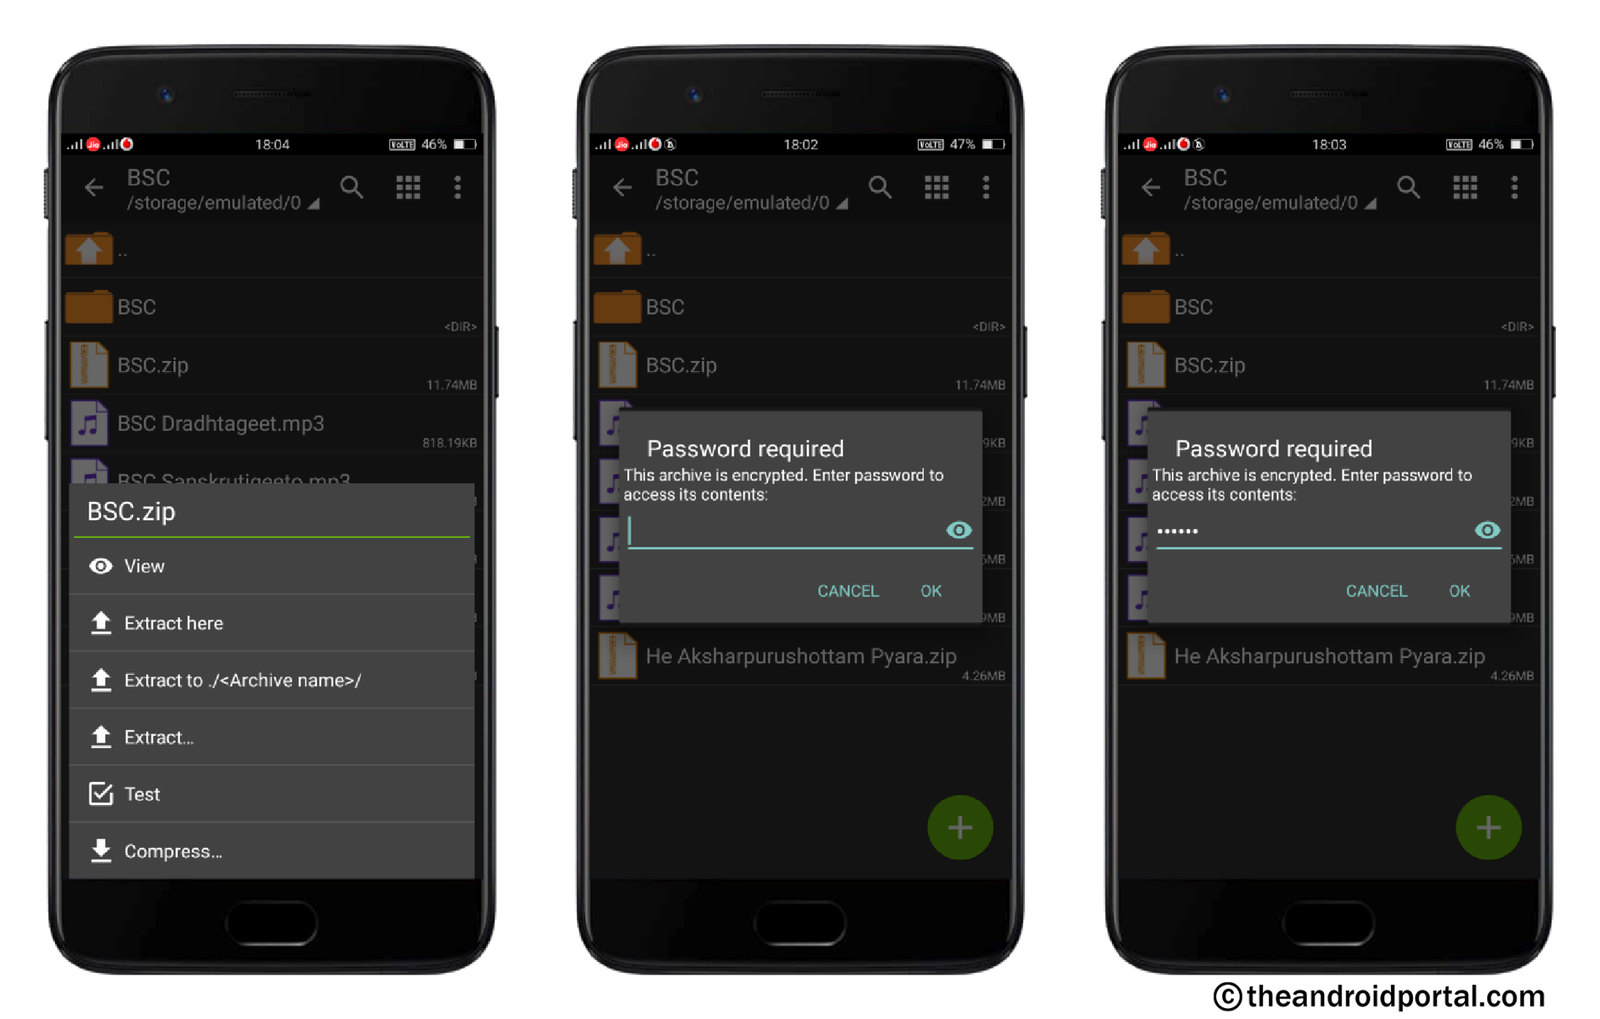
- If there is no error to show, the test will end up with the message Archive Does Not Contain Errors.
If you get a No Error message as written above, then you are free to extract that tested file.
Here, keep in mind that if the file that you want to test is encrypted, you can not test it. To continue the test, you must enter the password.
Extracting the file
To have accessibility to the data of the archived files, you must extract it. Nowadays, many of the latest smart devices are coming with built-in extracting ability. For that, what you need to do is just tap on the compressed file and it asks you to extract the file. As you allow it, the file will be extracted in a few time.
Coming to the ZArchiver Android App, it also lets you do the same within the app. Also, it offers three ways to extract the archived files in a different location. So, take a look at the steps and follow them.
- Open the app.
- Go to the folder which contains the archived files.
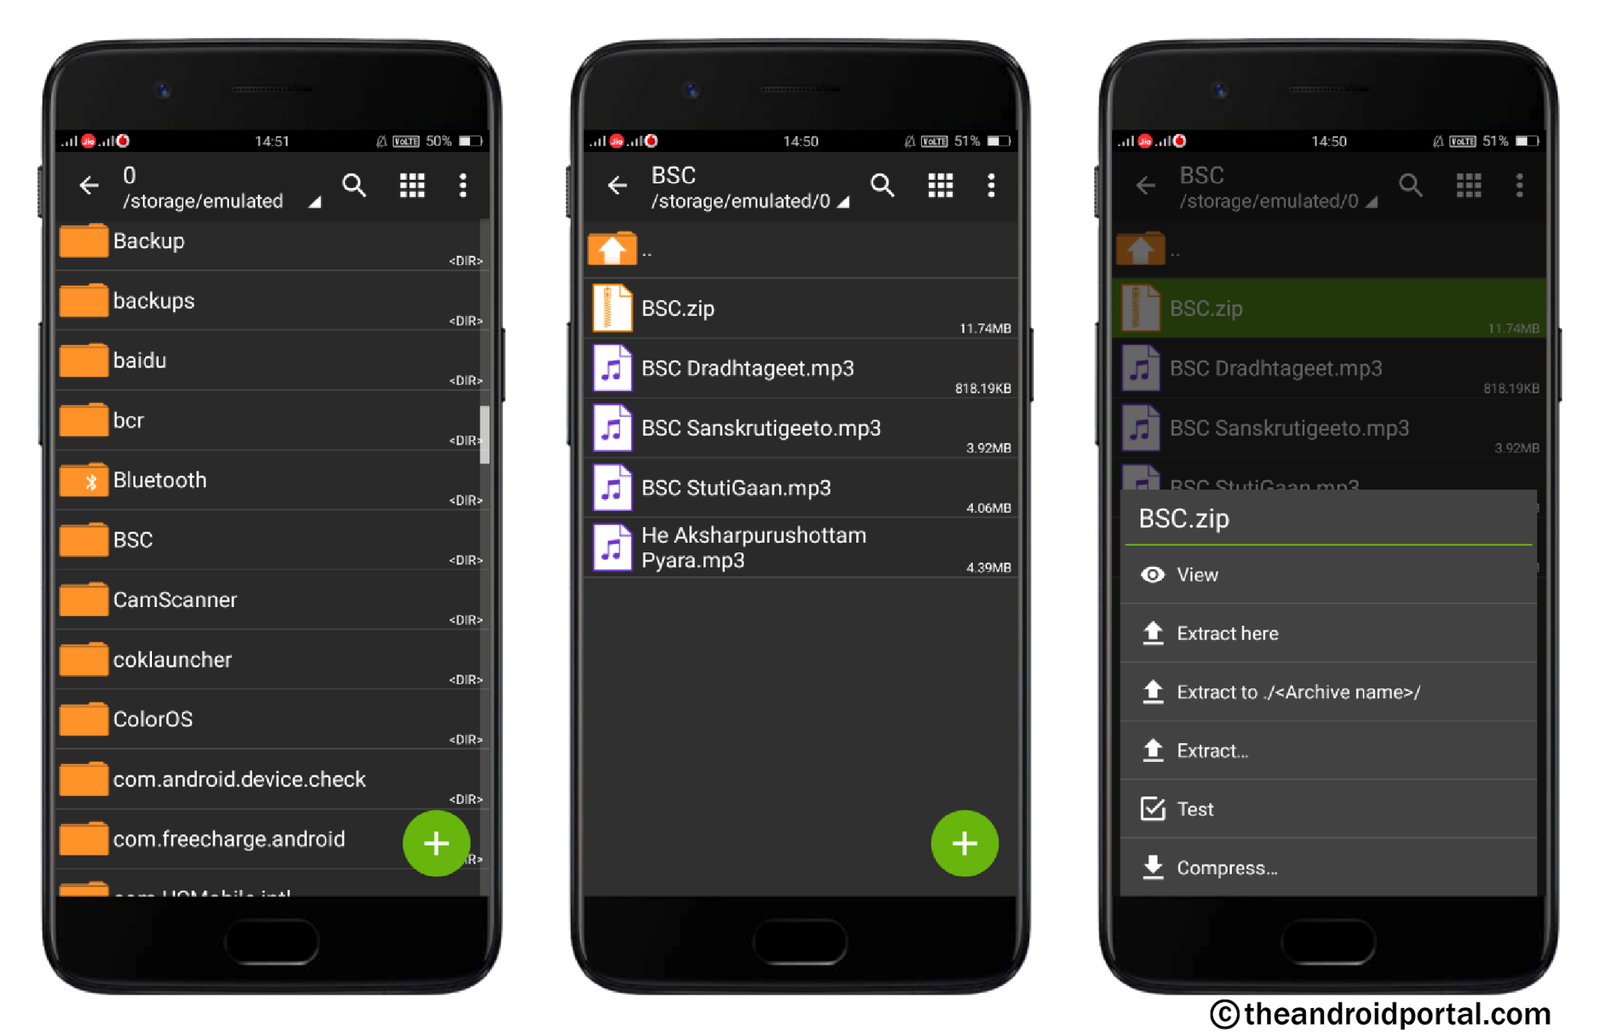
- Here, tap on it to have some options like View, Extract Here, Extract to ./<Archive Name>, Extract…, Test, and Compress.
- The three different extract options will let you extract the file according to your needs.
- If you want to extract the archived files at the location from where you have opened, go with the Extract Here option.
- When you want to extract the files in a separate folder with the same name as the archive file, tap on the Extract to ./<Archive Name> option. What will it do? It will automatically create a new folder with the same name and the extracted files will be found under that folder.

i.e. If the archive file has a title of BSC.zip. Here, you want to create a new folder with the extracted data and the same name, then select the Extract to ./<Archive Name> option. After the extraction, you will have a new BSC folder which consists of the extracted data.
- If you want to extract the file at a different location than its parent location, go ahead with the Extract… option.
File Sorting Using Categories
The sort by option now becomes very typical which can be found mostly in each app. In actuality, it is very useful when we want to set all the files using the available categories.
You can also find the same option here in ZArchiver App. Here is how you can get to it to sort the files.
- Open the ZArchiver App.
- Tap on the Menu option looks like three dots at the top right corner.
- It brings options like Multi-Select, Sort by, Create, Settings, About, and Exit.
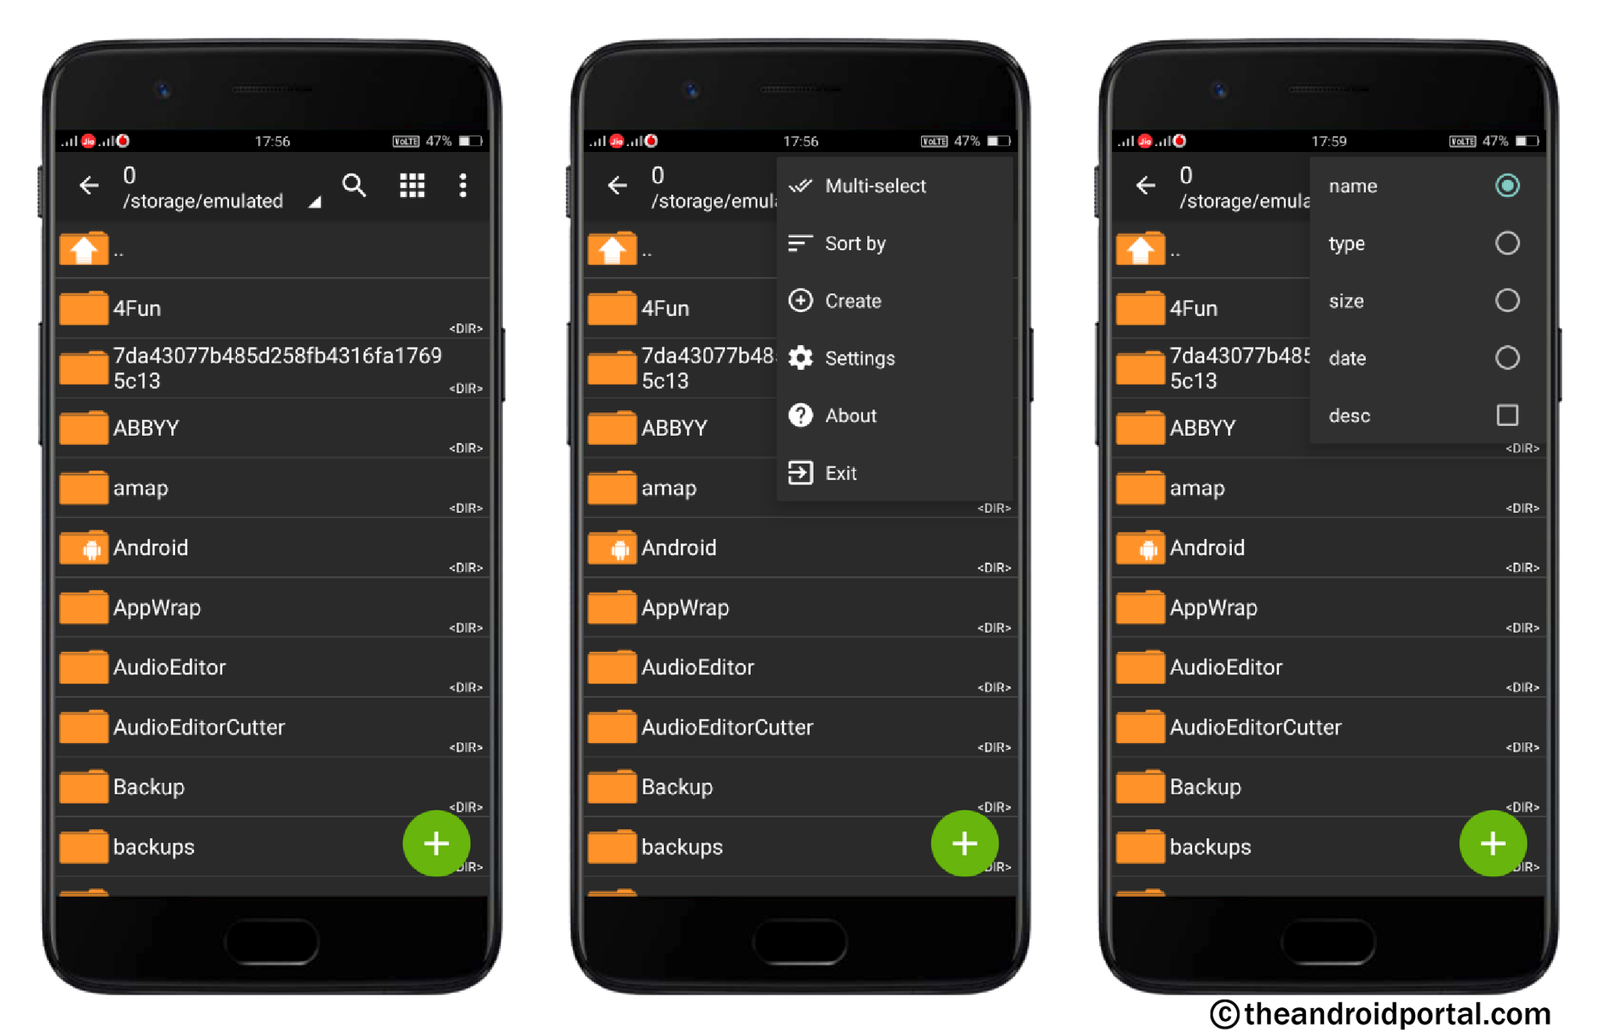
- Go to the Sort by option.
- It offers sorting categories like Name, Type, Size, and Date.
- Here, select the most suitable and all the files will be sorted according to it.
So, here we have mentioned all you need to know about ZArchiver Android App. Using this app, you can easily create the archive files. Also, it lets you extract the files effortlessly.
Do not you think the ZArchiver could be the best app when it comes to archived files? What’s your view on it? Do let us know below in the comment section. Also, share your experience regarding the guide.


