Have you ever faced a “There was a Problem Communicating with Google Servers” error? Whether it is on Xiaomi, Samsung, Oppo, Vivo, or any latest mobile smartphone. However, this error often comes whenever you are about to open the Play Store after resetting the device. It occurs even if the account has already been added to the device.
If this error occurs, then you should no longer be able to use such a Google service unless you fix it. And this is why it is essential to fix it as quickly as possible. So, here we have a quick guide on how to fix the Problem of Communicating with Google Servers error.
How to Fix There Was a Problem Communicating with Google Servers?
In this quick guide, we will let you know some tricks to fix the issues related to Android smartphones. So, let’s look at the guide and try our best to fix it.
Check the Connectivity
Many people might consider this silly, but it is most important to check the connectivity. Many times, due to something or some reason, we might forget to enable the connectivity. So, checking the connectivity whenever you face such an issue is always beneficial.
If you are using a mobile data connection and the error message appears, check the network first. If you are in the area where the poor signal is coming, then it is advisable to enable the flight mode. Wait for a while, and then disable the flight mode and turn on the data connection. You may check other factors if you are still at the same stage.
Check wisely if you are using the Wi-Fi network connection and get the error message. First of all, check whether the Wi-Fi option is activated or not. If it is on, then check the range of the Wi-Fi connection and mobile. However, other factors are also required to be monitored.
Check the Date and Time
Settings of the time and date are one of the most natural things. But, when you fail to do so, you might face some issues. So, here, in this case, you have to do it if the device does not have the right date and time settings.
To do so,
- Go to Settings >> Date and Time.
- Here, set the time and date.
- You can also select the option Use Network Service Provider Time.
Your issue may be fixed by setting up the correct date and time on your mobile phone by following the above steps.
Remove & Re-add Google Account
This is one of the easy but very effective tricks to get rid of the There was a Problem Communicating with Google Servers issue. Here, we will remove the Google Account you have added to the device. After doing so, we will add it again to let you use the Google service to continue.
But, before removing the account, keep in mind that all data related to that account will be wiped. So, if you have something important, do not forget to take the backup.
Now, the procedure for removing the Google Account is listed here.
- Go to the Settings.
- Then, go to the Accounts option.
- On the next display, you should see an option of Google Options. Tap on it.
- It will show you the list of all the existing Google Accounts on your device right now. At the same time, it does not matter whether you regularly use those accounts or not.
- Now, select the Google account from the list you want to remove. Then, tap on it.
- It will open a display for you. On this display, you should see three dotted points at the top right corner of it. Tap on it.

- A single tap on that dotted point will open a pop-up for you. In the pop-up, Sync Now and Remove account options will be there.
- Click on the Remove Account option to remove the Google account. The selection of it will prompt you once again. The prompt says, “Removing this account will delete all of its messages, contacts, and other data from the phone!”
- Here, once again, you must choose the Remove Account option. It may take some time to reset the Google account. Wait until the completion of the process.
Now, the Google Account will be removed from the mobile. Then, it’s time to Re-add it again. To do so,
- Again, Go to the Settings.
- Go to the Accounts.
- Tap on Add Account.
- On the next display, you should have some options to choose from.

- Now, go into the Google option.
- And it will ask you to create a new Google Account.
- But, here we are about to add the account which has been created already.
- So, simply just enter the ID and Password, and allow all the prompts.
And, you will be done. Now, try to use Google services. You might not get such an error message now.
For Rooted device
If you have a rooted device, you can follow the steps to fix the issue permanently.
- Remove your Google account.
- Download the root explorer apk & install it
- Open root Explorer first mount it as read and write from option
- Now go to system > etc >long press hosts and select “open in text editor.”
- Then erase everything from the host file on Android & type the following
127.0.0.1 localhost
#127.185.66.4 android.clients.google.com - Now save the file & exit.
If you don’t have installed Google Play services on your device, install the latest version of Google Play services or install from below.
Once done, Go to Settings > Add account > Configure your Google account & you will be able to log in as usual. You will not get any further errors.
Disable the Two-Step Authentication
The activation of the Two-Step Authentication also invites such error messages. So, to get rid of it, it is advantageous to disable it.
To disable the Two-Step Authentication on the Android device, the below steps will help you.
- Go to the Settings.
- Tap on the Google option and then go to the Google Account.
- Under Security, click on Signing into Google.
- Here, you can see the 2-Step Verification option. Tap on it.
- You need to enable the data as you need to sign in to disable it.
- Now, simply tap on Turn Off.
Deactivating Two-Step Authentication will remove all the backup codes you have saved for signing into the account.
Clear the data and cache of Google Services
We all know that the Google Play Store is the most popular market for all Android users. It provides all the useful apps for Android mobiles. But, after downloading the apps, some data has been saved regularly as app data.
These data are also used to run the particular app smoothly. But, when the app data exceeds the limit, it will start causing some issues.
So, the large amount of app or cached data may be the reason for this error message. So, it is essential to delete cached data from Google Apps. Here is how you can do so.
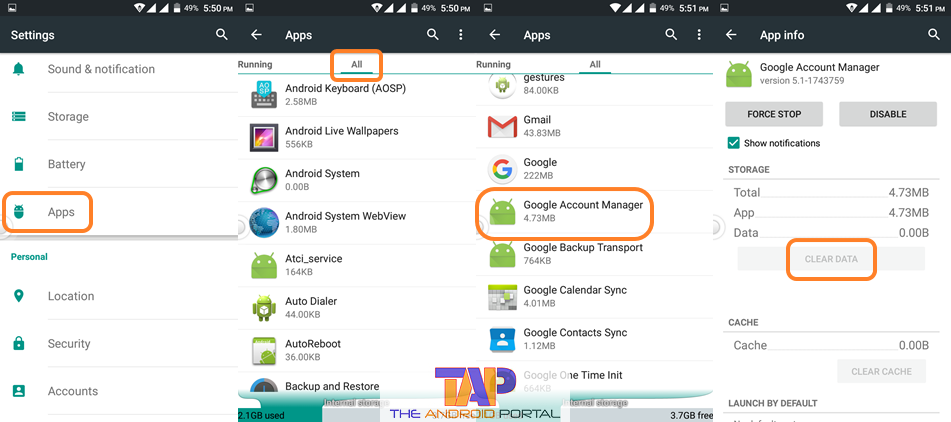
- Go to the Settings.
- Then, go to the Apps or Application.
- Then, swipe the display from right to left side 4 times. Come to the All tab. It shows you all the apps that you have on your mobile.

- Here, first of all, we will delete the cached data of Google Account Manager. So, by scrolling down the display, find the Google Account Manager option. Tap to open it.
- The next display is what we are waiting for. On which, tap on two options, Clear Cache and Clear Data one by one.
- It will clear all the unwanted data which is causing the issue.
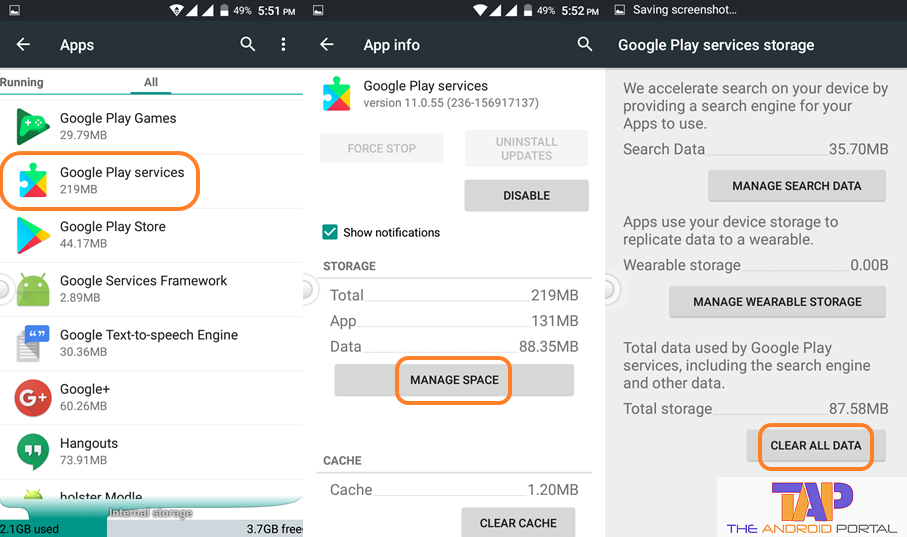
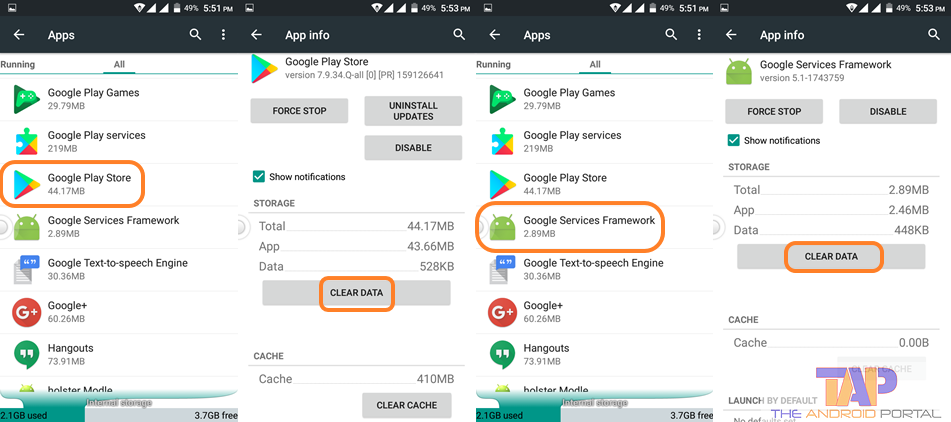
Then, follow the same process for the below-listed options.
- Go to the Settings >> Apps >> All tab >> Google Play Services >> Clear Cache and Clear Data.

- Go to the Settings >> Apps >> All tab >> Google Play Store >> Clear Cache and Clear Data.

- Then, Go to Settings >> Apps >> All tab >> Google Services Framework >> Clear Cache and Clear Data.
So, here we have deleted data from four apps, Google Account Manager, Google Play Services, Google Play Store, and Google Services Framework.
Now, try to use specific Google services. Now, you might not have seen this error again.
Reinstall Google Play Services
If you continue seeing this error on your device, you should consider reinstalling Google Play services on your device. You will need to Download the Google Play Services APK from third-party websites.
To reinstall Google Play services, follow these steps:
- Go to Settings > Security > Check Unknown Source
- Go to third-party websites to download Google Play Services
Some of the websites to download Google Play services are uptodown.com, apkmirror.com
Install that on your device to see if the problem was fixed.
So, whenever you are facing a problem connecting to Google servers, the above guide will help you. The tricks will work to solve the issue and allow you to use Google services seamlessly.
Do let us know your take on this quick guide from The Android Portal. Also, share it with other users if you get happy results by applying it.


