Google is the word that we can’t lose wherever we are. Wherever Whenever we try to run with the latest technologies, we always come across the service that is provided by Google. This is the reason why we have lots of Google Services. It includes Google Calendar, Google Keep, Gmail, YouTube, Google Drive, Google Maps, and the list will go on. Here, we will also throw a light on another Google service named Google Tasks. So, let us go through all the features of the Google Tasks.
But, when it comes to the use of this Google service, many of the users do not know how and where to use it. So, to let them know everything about Google Tasks, this is why we are coming up with the relevant topic. In which, we will include all the elaborate details and info.
Let us have a ride over the guide, Google Tasks – Everything you need to know!
Google Tasks – Everything You Need to Know!
As the name suggests, it is clearly said that this is the service pushed by Google. From the name only, you may get an idea of what it can be used. Let us start with the common info of Google Tasks.
Google Tasks is the service that will let you track all of your goals, activities, and tasks. With it, you can easily track, organize, and manage all the activities that you need to do. The Google Tasks in the form of an App is available for both the major OS users, Android and OS. Aside from that, it can also be used as an extension if you are an active user of Google Chrome Browser. Now with the recent updates, you can find it in Gmail and Google Calendar as an additional feature while using the Web Browser.
The main feature of this service is to not let you miss any goal, task, or activity. In short, Google Tasks will be one of the best apps for tracking your to-do list. Except for this, one of the exceptional features is the great syncing ability across devices and browsers.
So, one by one, we will mention all the necessary info on how to use it across the other Google services.
Manage Google Tasks using Gmail through Computer
After the recent updates in the design and interface of Gmail and Google Calendar, you can have eased to use Tasks. But, note that this feature will only work when you are using these services through a PC. If you are supposed to use this feature while using Gmail from the mobile, it will not work.
To use the Google Tasks through Gmail, one more thing you need is the updated UI of the Gmail. If you are not using it, quickly switch to the new mode to have maximum utilization of the Tasks.
Now, to manage all your to-do things, goals, tasks, and more, you will have Google Tasks in your Gmail. With the great Sync ability, the mobile app can sync with change within seconds.
Manage Google Tasks using Google Calendar through Computer
As we have done it in Gmail, it is also quite easy to do so in the Google Calendar. You can easily manage the Google Tasks through Google Calendar on a PC. The Google Calendar lets you add goals, tasks, and activities to have an easy tracking of it.
Use Google Tasks from your Android Smartphone
Now, we will discuss the use of Google Tasks on your Android-owned smartphone. To use Google Tasks, first of all, you need to have the app on your mobile. To download it, the Google Play Store will help you. By going there, just enter the name of the app in the Search bar. Download it on the device and then install it too. Also, it will ask you for some permission, allow it without any tension.
On the main interface, you will have a screen with the Get Started option. Tap on it to go ahead. After that, you can use the Tasks without any hesitation.

There are various things that you are doing by using the Google Tasks. So, now we will see all the features of the Google Tasks one by one.
Add a New Task
As we know Google Tasks is the app or service that lets you track your goals and tasks. To track those activities, you must add tasks first. So, with this feature, you can easily add the task to the app.
- Open the Google Tasks App on your mobile.
- On the first screen after opening it, at the end of the screen, you can see Add a new task option.

- Tap on it to do so.
- Now, add a task with some specific title for easy access. Then, tap on Save to save it.
Now, you can see the list of added tasks. This Google Service will let you add tasks as many as you want.
Add Task Details and Date in the Added Task
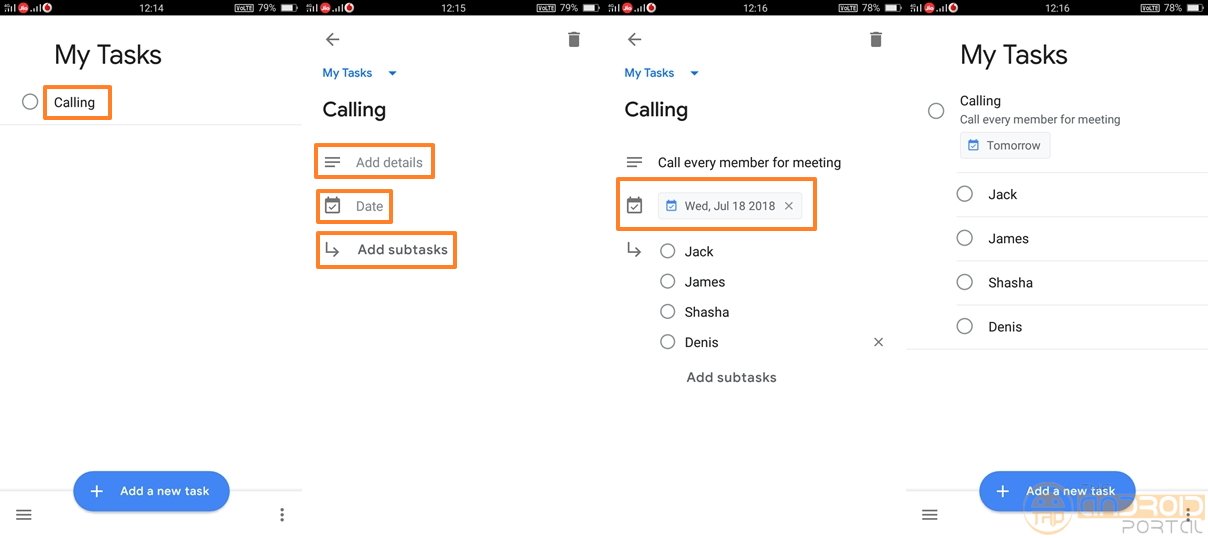
In the above step, we have only added the task, but what about the details of that particular task? Yes, with Google Tasks, you can add small details of the task including date, time, subtasks, and more.
- To add the details to the added task, tap on the task in which you want to do it.
- Now, you will have three options Add details, Date, and Add subtasks.
- To add details related to the task title, go ahead with the first option.

- The date option will help you to set the date of the task for easy tracking.
- The add Subtasks option will let you add the subtasks of the added tasks.
Here, you can add multiple subtasks at a time.
Create New List
With Google Tasks, you can also create your new list to keep it aside from all other added tasks. This feature is very useful when you are supposed to accomplish any major project. A big project always contains many sub-parts and sub-branches. So, to make all those tasks under one roof, this feature will help you.
First of all, we will go through the process of Creating a New List.
- After opening the app, you might see three horizontal lines at the lower left corner of the screen.
- A single tap on it will bring an option to Create a New List.

- Tap on the Create New List and it will ask you to choose the title of the list.

- Now, to add the tasks to the new list, you can follow the same process as we have mentioned in the above points.
In short, you can use all the features we have discussed in the above point. But, what’s the difference is the tasks you add will be contained under the list you have chosen.
Move Task
To easily organize the added tasks, you can also move one task to another list of tasks. It can be done with some quick steps.
- First of all, decide the task that you want to move to other lists.
- Then, tap on the tasks that you have decided on.
- Now, right above the title of the task, you can see the name of the list in blue color small sign.

- Tap to it and it offers two options at the end of the screen under the tag of Move Task To. The two options are the list that you have created to add the tasks.
- Now, select the appropriate list in which you want to move the particular task.
In this way, you can easily move the tasks to another list.
Rename Task
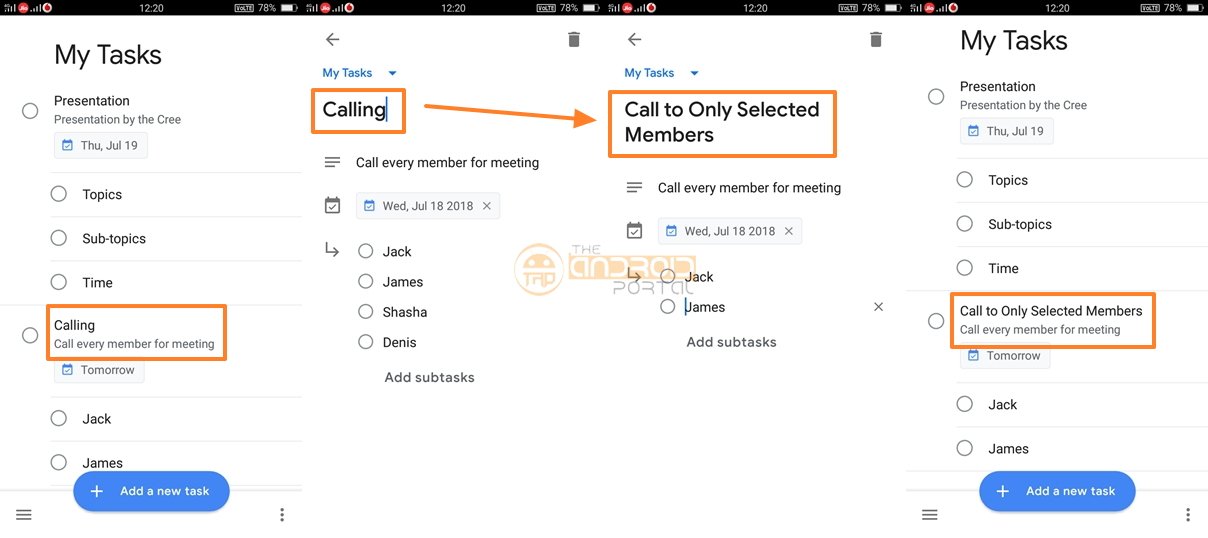
We all have written the name of the task at the time of making it. Now, it is one of the easiest things to rename the name of the task. It can be done with simple steps.
- Just, choose the task that you want to rename.

- Then, tap on it to open it.
- Here, just erase the name and write a new one.
In this way, you can also change the name of all the tasks.
Keep it in mind that this is the way of renaming the task, not the list. For the rename of the list, look at the below point.
Rename List
Along with the task rename, you can also have a feature to rename the list. But, to rename the list, you may have a not easy process like the task. To get to know how to rename the list, figure out the below steps.
- Here, choose from the list.
- Then, open it in the app.
- Now, you might see three dots at the end of the screen in the lower right corner.

- Tap on it and it will have some options to choose from.
- Here, the third option of Rename List will help you to change the list name.
- After writing the name, tap on the Done which is at the top right corner of the display.
Delete Task
As we have seen earlier, the Tasks will help you to track all the goals and tasks. For that, you must add the task to the app. But, what if you come to know that the added task is not useful? At that time, deleting the task might be the best option.
- To delete the added task, tap on the task.

- On the next display, you can see a typical Delete sign at the top right corner.
- Tap on it and that task will be deleted.
Delete List
With Google Tasks, it is also easy to delete any list that you have created.
- First of all, open the list which you do not want to keep in the app.
- Then, tap on the three dots at the end of the screen in the lower right corner.

- It will open a half screen containing the option which includes the Delete List option.
- As you tap on it, it will prompt you for your confirmation of deleting it.
- Here, tap on the Delete option to go ahead.
Also, the delete process of the List will erase all those tasks that you have added.
Add the task to the Completed Task
To make the tracking of goals and tasks, Google Tasks provide the best tool. But, once the task is completed, it must know it. So, to add the task to the completed task, the app also has a feature.
- After adding every task, we all can see a small circle before the task name.
- It will help all the users to add the task to the completed one.
- So, here just tap on that small circle when you have done the task.

- As soon as you do so, the task will come into the Completed task.
- You can also check it on the same screen with the Completed option.
- It also shows how many tasks and sub-tasks you have done.
Delete Completed Task
To free up the app memory, it is essential to delete the completed task. To do so, you will have two ways.
- After adding the tasks to the completed, again tap on the three dots in the lower right corner.
- It offers some options, in which the last option is to Delete all completed tasks.

- Tap on it and you will be asked to finalize the action.
- Just click on the Delete option and all the completed tasks will be permanently removed from the data.
So, this is the way that helps you to remove all the completed tasks.
Sort the Tasks
Along with so many abilities of the Tasks, the sorting of the added task is one more. You can easily sort the task with two options such as My Order and Date.
- Tap on the three dots at the end of the screen in the lower right corner.

- Then, choose from two options My Order and Date to sort the tasks.
So, this is the end from our side. Well, we hope that this helpful guide on Google Tasks will help you for easy tracking of goals, activities, and tasks.
Also, do let us know your views on the guide by commenting below.

